
Carpet replacement
Dear RV Doctor:
I have a 1987 motorhome and would like to replace the worn carpet. How was this carpet originally installed by the manufacturer? How do I install the new carpet?I’m very handy, but I need to know the correct procedures.
Paul Coleman, Worthington, Ohio
Chances are, Paul, the original carpet was simply stapled to an underlayment of plywood or pressboard. Keep in mind that during manufacture, some RV floors are fully carpeted before the partition walls, cabinets, and furnishings are installed, so you probably will not be able to remove every square inch. Complete removal is not always necessary anyway, since the old carpet can be selectively retained in closets and under storage cabinets.
If the existing carpet was installed before the cabinets and partition walls, carefully cut along the walls and cabinets with a sharp razor knife to remove it. Save these pieces. They can be used as a pattern for the new carpet. Be sure to check the floor area carefully after removing the old carpet. Sweep the wood flooring completely clean and sand any rough areas. Cabinet doors that are low to the floor should be removed for easier handling of the new carpet. If a thicker carpet and pad are going to be installed, some cabinet doors may have to be repositioned to accommodate the added thickness of the carpeting. In most cases, this is not a major concern, but I do recommend a thick carpet pad. Get a good one.
As mentioned, any removed sections of the old carpet can be used as a pattern for cutting the new one, but it is wise to leave a little extra material all the way around the perimeter and trim the pieces to fit exactly at the time of placement. A razor knife with a new blade works best for cutting virtually all carpet materials. Stock up on blades, and change them often during the installation process. Use a metal straight edge whenever possible to produce a nice, crisp edge. After cutting the carpet to fit, lay it out flat inside the coach and work from one end of the motorhome to the other. Force the new carpet into the edges at the cabinets and carefully trim the remainder of the excess with a sharp razor knife. Since the floor area in the RV is relatively small, a carpet knee-kicker usually is not needed; a decent staple gun should work. There are other means of attachment, but the stapler reigns supreme, because it is fast and easy to use, and the staples are easily concealed within the pile of the carpet. It is recommended that an electric or air-powered stapler be rented or otherwise obtained for this task. Double-faced carpet tape is also quite handy for attaching the carpet in close quarters or under cabinets where use of a stapler may not be possible.
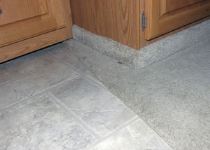
In most motorhomes, there is a point where the carpet meets linoleum, tile, or a wooden section of flooring. One transitional method is to simply fold the carpet under and staple it to the floor. When folding the carpet under, remove the woven backing from the carpeting first, then cut the pad back the width of the fold (approximately 2 inches or so), so that the folded carpet lies as flat as possible. There may be another preferred method for that style of carpeting, such as a metal or wooden threshold molding.
After the carpet has been stapled to the underlayment, remount any furnace ducts or cabinet doors that may have been removed prior to the installation. Keep in mind that it may be necessary to raise some cabinet doors to provide enough clearance above the new carpet for the door to swing freely.
When installing new carpet in the lavatory, it is best to remove the toilet completely and to allow the carpet to cover the floor all the way up to the perimeter of the floor flange. After installing the carpet, reinstall the toilet.
Take your time, double-check all measurements, and use a sharp razor knife, and the job of replacing the carpet should be a fairly easy task. In addition, new carpet will reflect a personal touch that can be enjoyed for many miles. And it always adds to the trade-in value.
Finicky furnace
Dear RV Doctor:
I have a Sol-Aire furnace in my motorhome. The unit runs and heats fairly well, but a problem occurs when it starts up the first time and after it’s been running for a while. It starts okay but backfires on startup. The blower comes on and then it begins to make popping sounds. The LP-gas pressure is correct, and all the other equipment runs fine. Someone suggested I check for cracks in the firebox. Any suggestions?
Dick Paul, Schenectady, New York
As far as I can remember, replacement parts for Sol-Aire furnaces are no longer being produced, including the firebox/combustion chamber. Unfortunately, the Sol-Aire had a propensity for the burner to literally burn away during those popping instances. According to some, it had something to do with the design of the burner. Over time, those mini-explosions eventually would blow a hole right in the burner mesh. You may be able to find repair centers that still carry replacement parts, but it would be hit-and-miss. The best bet is to begin searching for a replacement furnace that will fit in that same location. I wish I had better news, but obsolescence is something that occurs in the world of RVs from time to time.
{loadpositionEndBlurbHouseCalls}