From the city water inlet to the showerheads “” and everything in between “” learn how to keep your motorhome’s fresh water system in excellent condition.
By Gary Bunzer
October 2009
It’s a time-worn adage that the onboard water we utilize when traveling in a motorhome is only as fresh as the water source we use to fill the container. In other words, we have to trust the source “” campground spigot or city water supply at home “” in order to maintain a level of freshness that satisfies our personal requirements. But some coach owners are so leery of the water they put into their motorhome, they have resorted to carrying bottled water for cooking and drinking. This truly defeats one of the main tenets of the RV lifestyle: that of being totally self-contained and free to go anywhere our whims take us. Not to mention the hassle of finding room to store multiple gallons of bottled water. Heck, that’s why coach manufacturers put that big plastic tank in the plumbing bay, right?
Fear not! As the seemingly mundane aspects of a motorhome fresh water system take on a new sophistication, there should be no denying that stale, foul water or system contamination can be a thing of the past . . . as long as you do your part. Yes, like all of the major systems found on the modern motorhome, there are certain precautions and preventive steps that can be performed to ensure your onboard water system components remain fresh and optimized.
To begin this short primer, let’s start at the fresh water tank and take a brief look at the myriad fresh water components common to most motorhomes. (Note: not every motorhome will have each element discussed). Along the way, we’ll address those components that require periodic inspection and maintenance. Most motorhome manufacturers will recommend annual maintenance, but if you do not feel comfortable performing these procedures, simply call your local RV service center. They should be well-poised to perform these procedures for you.
Fresh water tank
Modern fresh water storage tanks typically are constructed of high-density polyethylene (HDPE) thermoplastic. The advent of plastic tanks many years ago alleviated concerns of metallic contamination and damage from electrolysis. Plastic tanks, thankfully, require little or no annual maintenance. Periodic flushing and annual chlorination practices are all that is needed. (See the chlorination procedures later in this article.)
In-line strainer
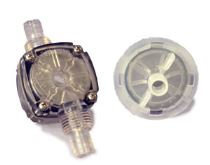
Not to be confused with a filter or a purifier, the purpose of the in-line strainer is to protect the demand pump from large particles or contaminants drawn from the fresh water container. The strainer will be attached directly to the water pump inlet fitting, or it may be positioned anywhere between the tank and the pump.
Oftentimes during manufacture of the motorhome, an opening into the fresh water tank is temporarily left unprotected, allowing sawdust, plastic shavings, and foam insulation particles to find their way into the tank. Such tank trash likely would migrate into the water pump, where it could cause damage. Most strainers are easy to disassemble for periodic cleaning. If yours does not come apart, replace it with one that does. Check it at least annually.
Demand water pump
The common demand pump today is virtually maintenance-free, self-priming, and nonadjustable. Keep feeding it good, clean water and it usually will perform flawlessly for many years, which is a far cry from the demand water pumps of times past. Unless an air leak exists at a fitting between the tank and the pump, rarely will a modern demand pump lose its prime.
The demand pump also can double as a troubleshooting tool to help determine whether a miniscule leak exists anywhere downstream of the pump. Obviously, a large water leak will be self-evident. But if a small leak is present at any fitting or fixture in the fresh water system and the pump is turned on, it will periodically cycle, if only for a brief moment. We call this water pump “burping”; just a quick on-off cycle as the built-in pressure switch in the pump senses the drop in system pressure as a result of the leak. The pump becomes activated; builds pressure quickly; and then turns itself off. After a few minutes, the leak will cause the pressure to drop again, causing the pump to cycle and build pressure again. Make no mistake about it; this burping indicates that there is a leak somewhere in the system.
In rare cases, there may be a pressure leak inside the water pump that causes the pump to burp. To determine whether there is a leak in the system or an internal leak in the water pump itself, here’s an easy test. With the water pump turned off, disconnect the plumbing tubing at the outlet of the pump. Cap or plug the outlet of the pump (determined by the type of connection at the outlet fitting on the pump). Turn the pump back on and see whether the pump burps again. If it still burps, the demand pump has an internal leak and may need repair. If it does not cycle again, the leak is somewhere in the rest of the fresh water piping system, and further troubleshooting is required to pinpoint its exact location.
Accumulator
The accumulator tank is installed anywhere in the cold system downstream of the demand pump. Its purpose is to even out the flow of water throughout the fresh water system and to eliminate any type of pump surging that may occur, especially during low-flow operation.
By design, a cushion of air remains on top of the water inside the accumulator tank. One style of accumulator simply traps a portion of air on top of the water; another style incorporates an internal bladder that keeps the air chamber separated from the water. Both types are equipped with an air inlet fitting so that the air gap on top of the water can be replenished. Accumulators can be recharged by applying approximately 50 psi of clean air to the fitting on the vessel. Be sure to use clean air; avoid service station air. After all, it is the fresh water system and some air supplies may be contaminated. Some larger motorhomes may be equipped with a combination demand pump and accumulator tank unit. However, the principles of operation and air replenishment remain the same.
City water inlet 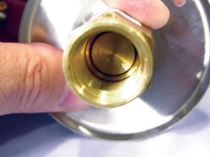 All motorhomes will be equipped with a city water inlet to connect to an off-coach water supply such as that found in a campground. In its simplest form, the basic city water inlet consists of a 3/4-inch female hose swivel fitting and a built-in check valve that prevents the demand water pump from forcing water out and through the inlet when operating on pump pressure.
Although no specific maintenance task is associated with the city water inlet, it should be noted that, on occasion, water impurities such as calcium or other mineral deposits may build up and prevent the check valve from closing completely, causing it to drip water when the coach is operating on demand pump pressure. To dislodge the blockage, simply push the inlet spring inward from the exterior of the motorhome while operating the demand pump. The eraser end of a common #2 pencil will work well for this operation. To avoid getting soaked, stand back a bit; the pump will expel water out the inlet when the valve is pushed open!
Ice maker and clothes washer
As the cold water tubing is routed to each of the faucet assemblies inside the motorhome, it may make a few detours to other fresh water system components, such as an ice maker or clothes washer. Ice makers, either integrated into the absorption refrigerator, or as a stand-alone appliance, should also be considered a part of the fresh water system. It’s recommended that a dedicated, in-line water filter be employed at the ice maker if the whole coach is not protected by one. If the ice maker has a filter or purifier, be sure to replace it at least annually. The same goes for the clothes washer; if it is indeed equipped with a water filter, clean or replace it at regular intervals.
Don’t forget to review the owners manual for the ice maker and clothes washer for other specific tips and maintenance procedures required by the manufacturer.
Faucet aerators
At each faucet, clean the aerator screens if possible. Most will simply unscrew and are easily removed for cleaning and rinsing. Common sense stuff, really. Keep in mind, not every motorhome faucet assembly will have a removable screen.
Anti-siphon/vacuum breaker fitting
Most showerheads are connected directly to the shower faucet assembly using an anti-siphon vacuum breaker fitting attached to the showerhead hose. This anti-siphon fitting will automatically drain the water in the hose each time the shower faucet is turned off. This prevents any possible cross-contamination from occurring between the fresh water system and the waste system. Although the anti-siphon device may be annoying to some RVers, it is a necessary component that prevents such cross contamination.
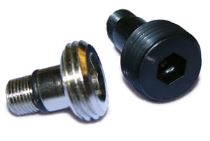 However, it is permissible to use a “D” ring attached to the shower wall with the hose passing through it. This too, will effectively prevent the hose from reaching the toilet or lavatory sink. If a “D” ring is installed on the shower enclosure wall, a “D” spud can be used in place of the anti-siphon fitting. It looks similar to an anti-siphon fitting; the difference is that it will keep water in the hose and enable the user to avoid spurts of cold water or air. The issue with the anti-siphon fitting and the “D” spud is that each restricts the water flow to the showerhead. The fitting attaches to the faucet assembly with only 1/8-inch pipe threads. Quite a small hole when you consider the main fresh water distribution system is probably plumbed with 1/2-inch tubing or larger. This internal restriction also may cause the demand pump to pulsate. Here’s a tip: Try enlarging the tiny hole in the fitting, using a larger drill bit. It won’t totally eliminate the restriction, but it will help.
Speaking of showerheads, don’t forget the exterior showerhead if the motorhome is so equipped. Periodically check all showerheads for any mineral deposits and clean them accordingly.
Filters and purifiers
Many motorhomes are equipped with a fresh water purifier or a filtering system. These may be “total coach” devices that clean and purify all the fresh water entering the motorhome. Other installations may service a dedicated spigot in the galley. Some systems are permanently installed, and others are employed only when the coach is connected to the city water system. There are many pros and cons regarding each type; just be aware that they require regular cleaning or media replacement. Refer to the product’s owners manual, as the specific maintenance procedures will be determined by the design and intent of that particular product. If there is any doubt as to a purifier’s effectiveness, however, test kits are available that quickly can determine just how well one is working.
A quick side note: When winterizing the motorhome using RV antifreeze, be sure to remove or bypass the fresh water purifier completely. Some filtering media can be neutralized or have their effectiveness reduced by the antifreeze. In the case of cartridge-type purifiers, they usually come equipped with a shutoff valve or a “dummy” cartridge.
Water heater
Don’t overlook the fact that the water heater is also a major component of the fresh water system. So far, we’ve only looked at the cold water side of the system; the water heater requires periodic maintenance as well. Although there are detailed maintenance steps associated with an LP-gas system as it applies to the water heater, here we’ll focus solely on the fresh water aspects of the appliance.
Flushing the water heater’s inner tank is the main task to consider. To extend the life of the inner tank and to eliminate the buildup of mineral deposits inside, flush the heater at least a couple times each year. Mineral deposits settle to the bottom of the tank, so simply draining the tank will not rinse out these deposits completely, since the drain plug or drain valve is not positioned at the very bottom of the inner tank. A short piece of copper tubing with a 90-degree bend on the tip that attaches to your fresh water hose is a handy tool to employ to help remove the buildup. Most RV supply stores sell a water heater flushing tool.
Step-by-step instructions for flushing the water heater appear on page 49.
Earlier I mentioned the backflow preventer/check valve at the city water inlet. There also should be a one-way check valve at the cold inlet to the water heater. This prevents the heated water from flowing back into the cold water plumbing. Normally, this isn’t an issue, but there have been instances in which the heated water was drawn into another fixture, such as the toilet, particularly if there is a cold water tee plumbed into the system fairly close to the rear of the water heater. It can be a bit unnerving to see steam rising from the toilet whenever it’s flushed. You chuckle, but it has happened.
Although there is no maintenance required for this check valve (or the one positioned at the outlet fitting on the demand pump), I mention it in case your water heater does not have one. It’s a relatively simple installation, and it may save the water heater from expending energy trying to heat the water in the cold piping outside of the water heater.
Low-level drain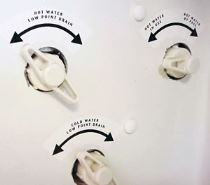 Every motorhome is equipped with a low-level drain for both the hot and cold fresh water lines. The purpose of these drains is to facilitate complete removal of all water in the fresh system during the course of a winterizing procedure. Some low-level drain assemblies consist of sophisticated manifold-mounted drain valves, while others may be individual shutoff valves that simply extend below the floor of the motorhome. On older coaches, some may not be valves at all, but rather simple pipe plugs that are removed when the need for total draining arises.
Since water usually doesn’t flow through these sections of the system on a regular basis, any low point locations below the floor line are prone to gather contaminants and mineral deposits that have traveled throughout the fresh water system. Periodically open the drain valves to allow any dregs to be flushed out.
Sanitizing and chlorination
Foul or stale-tasting water not only has the potential to ruin a vacation but, in some cases, it can be harmful to one’s health. Most city water supply systems contain sufficient chlorine to kill the majority of bacteria, but if foul-tasting water persists, it may be necessary to treat the entire fresh water system. Now that we reviewed the common individual components found in the fresh water system, let’s look at one of the most controversial aspects of fresh water maintenance: specifically, chlorinating the entire fresh water system.
The Internet abounds with forum discussions on how and why to add bleach to the fresh water in order to sanitize and chlorinate the system. It would be difficult, at best, to list all the methods and recipes that are cussed and discussed online. Seemingly everyone has an opinion of how it’s to be done. Thankfully, the Recreation Vehicle Industry Association (RVIA), the governing body that oversees recreation vehicle construction practices for its members (see the seal next to your motorhome’s entry door), in association with water safety experts, has come up with the “official” method. This is the procedure taught in all RV schools around the country endorsed by RVIA and the Recreation Vehicle Dealers Association (RVDA). See page 50 for step-by-step instructions.
There you have it. Regular and attentive preventive maintenance to the fresh water system on the motorhome can eliminate those annoying distractions that can diminish the joy of an RV excursion. Proactive coach owners will, no doubt, reap the benefits. Remember, RVing is more than a hobby; it’s a lifestyle!
Flushing The Water Heater
1. Make sure all energy sources to the water heater are turned off and that the water inside has cooled.
2. Turn off all sources of water pressure “” the demand pump and the city water supply.
3. Drain the water heater by opening the drain valve (or removing the plug). To aid in draining, open all the hot water faucets throughout the motorhome.
4. When water barely trickles out of the drain, remove the drain valve. Carefully insert a straightened coat hanger into the drain opening and rotate it around the bottom of the tank to help break up any calcified deposits. If the water heater is an Atwood model, take special care not to scrape the inner sides of the tank or damage may result. Thoroughly clean out the tank using the water heater flushing tool mentioned on page 51.
5. Close all the hot faucets opened earlier and turn on the city water supply or the demand pump (the higher the pressure, the better). If a pressure regulator is normally used in-line with the city connection, temporarily remove it for this step.
6. Open the pressure-and-temperature (P&T) relief valve and allow water to gush from the drain opening as fresh water rushes in.
7. Allow this flushing to continue for five to 10 minutes. This will remove any stagnant water along with any residue on the bottom of the tank.
8. After approximately 10 minutes of flushing, turn off the water pressure source; reinstall the drain plug (or close the drain valve); and close the P&T valve by allowing the lever to snap shut.
9. Turn on a water pressure source once again and open all the hot water faucets inside the coach until water flows freely from all hot faucets. This will fill the water heater and eliminate air pockets in the distribution system.
10. Finally, turn off the water source and all but one of the hot faucets. Then open the P&T relief valve once again to release any water at the top of the tank and to establish a cushion of air on top of the water. This air gap is necessary so the heated water will have room to expand. When water stops dripping from the P&T valve, close the last hot faucet inside the RV and snap shut the P&T valve. The heater is now prepared for use.
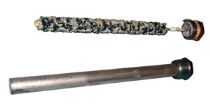 If the heater is a Suburban model or an older American Appliance water heater, during the flushing process, remove and inspect the anode rod. Replace the sacrificial anode rod when it is reduced to 25 percent of its original size. If you ever experience a rotten egg smell associated with the hot water system, chances are the anode rod needs to be replaced.
On modern Suburban heaters, the anode is actually the drain plug. On the older American Appliance heaters, the anode will be accessible inside the coach at the rear of the heater.
Chlorinating The Fresh Water System
1. Drain and flush the fresh water tank; leave empty.
2. Using a mix ratio of 1/4-cup of liquid household bleach (sodium hypochlorite) with one gallon of fresh water, make up one gallon of chlorine-water solution for every 15 gallons of fresh water tank capacity.
3. Pour the chlorine-water solution directly into the fresh water tank through the gravity fill. Note: If the RV is not equipped with a gravity fill for the fresh water tank, use a funnel to pour each gallon of the mixture directly into the fresh water hose prior to connecting it to the city water source.
4. Top off the tank with fresh water.
5. Remove or bypass any water purification equipment and/or filtering cartridges.
6. Turn on the water pump and open every faucet in the RV, including the exterior faucets and showerheads.
7. Allow the solution to pump through the system to the toilet, through the water heater, and to every hot and cold faucet at each sink until the distinct odor of chlorine is present at every fixture. (You can open one faucet at a time or all at once.)
8. At the city water inlet, using the eraser end of a pencil, push in on the check valve spring, allowing the solution to pump out through the city water inlet until the chlorine odor is detected in the discharge.
9. Close all the faucets and turn off the water pump.
10. Allow the chlorinated water to remain in the system for four hours. This should chlorinate and disinfect the fresh water tank, the water heater, the faucets, the complete piping system, and all fittings to a residual level of 50 ppm (parts per million).
11. Once you reach four hours, drain and flush the system once again and top off the water tank with fresh water.
To avoid damage to delicate plumbing components found in some water pumps, do not allow the chlorinated solution to sit longer than four hours in the fresh water system. If 100 ppm residual concentration is required or desired, use 1/2-cup of bleach instead of 1/4-cup with each gallon of the solution and let it stand for one to two hours.
If the odor of the chlorine is still very strong after you have drained and flushed the system, drain, flush, and refill the tank again until you are satisfied. This process should be performed after any extended period of nonuse, such as after storage; whenever stale or distasteful water is experienced; or at least once per camping season.

