
Noisy Water Pump
Dear RV Doctor:
The water pump in my motorhome is turning on about every couple of minutes without any faucets calling for water. It is also very noisy and vibrates the pipes down the side of the RV. There are no apparent leaks, kinks, etc. What could be the problem? It did not do this when it was brand-new.
J. Reed, Mills, Wyoming
You say you have no apparent leaks, but be sure to carefully check for any evidence of moisture inside the cabinets, storage compartments, under the coach, etc. Carefully check all the fresh water plumbing tubing in the RV, including the hot side, just to be sure. A cracked fitting anywhere in the system, even though it may not be large enough to cause a huge puddle, can still cause a drop in system pressure “” enough that the pressure switch senses this reduction and starts the cycling.
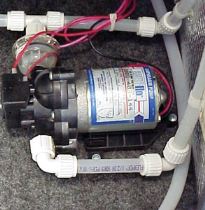
If you are absolutely sure no water leak exists, it might be time to have the water pump itself checked. Some pumps can leak internally, meaning that even though there is no call for water (no faucet turned on), it may have an integral leak. The pressure switch, built into the pump head, may sense a drop in pressure and short-cycle the pump. It’s as though the pump “burps” for a few seconds. Basically, it starts up, quickly builds the pressure, and then shuts down. A weak spring in the pressure switch could be at fault, or it’s possible that a worn seal is not fully shutting off the water flow through the pump head. With an internal leak, there would be no evidence of water puddling or dripping.
One surefire way to determine where the problem exists is to cap off the water pump outlet fitting. You may need to purchase a plug or a cap in order to do this, but by terminating the outlet port of the pump, you’ll be able to isolate the problem to the pump itself or another fitting/component in the rest of the system. After you cap off the outlet port, turn the pump back on and wait. If it still short-cycles periodically over the course of a couple hours, there is a problem inside the pump. If the short-cycling stops completely, there is a leak somewhere else in the system, meaning further troubleshooting would be in order.
As far as the pump being noisy, be sure it is secured well to its mounting surface. The best location is flat on the floor of the coach. Make sure the mounting screws and rubber isolators are intact and secure. If the fresh water tubing is semi-rigid PEX, it’s advantageous to have a double loop of flexible tubing connect directly to the outlet side of the pump before it attaches to the rest of the PEX tubing.
SHURflo (800-854-3218; www.shurflo.com) makes a “Silencing Kit” that consists of a couple of flexible connectors and the appropriate fittings. This kit is adaptable to any RV water pump. Ask for part number 94-591-01. If the pump is still overly noisy, another option is to add an in-line accumulator. The accumulator invokes a cushion of air and acts like a shock absorber of sorts to soften the vibrations caused by pumping water.
Two Air Conditioners, One 30-Amp Shore Line
Dear RV Doctor:
I have an older Pace Arrow motorhome that has two roof air-conditioning units. The front air conditioner will not run (fan or compressor) on shore power, but when I start the generator, the front unit will work as normal. Any suggestions?
B. Beheler, Aiken, South Carolina
It’s apparent your motorhome is equipped for only 30-amp shore power. Having a 30-amp limitation basically means that you can operate only one air conditioner at a time while connected to shore power. The reason for this is that each air conditioner must be on its own separate 20-amp breaker. So, in order to operate all the other 120-volt-AC accoutrements, you’re limited to one roof air conditioner at a time.
The generator, however, is sized large enough to handle both air conditioners at the same time. At least this was the typical setup. One air conditioner is probably hardwired directly to the generator.
There should be a set of switches inside your motorhome (some call them “either/or” switches) that allow you to choose between the front and rear air conditioner while connected to shore power. The switches also could be configured to run both air conditioners simultaneously when powered by the generator.
Motorhomes with 50-amp service do not have this problem, since there are 50 amps available on two separate legs of 120 volts. On these coaches, each air conditioner is wired through a different leg. Again, it’s all in the math.
If it is extremely important to operate both air conditioners at the same time, the only safe and code-compliant option is to install an aftermarket energy management system (EMS) that automatically will cycle each air conditioner, one at a time.
Awning Arm Security
Dear RV Doctor:
The floor frame for the bottom rear bracket where my A&E awning is anchored evidently has stripped lag screw holes. The original #14 2-inch screws now will not hold, because the previous owner opened the awning with the pull strap next to the front upright, not with the strap in the middle of the awning. This twisted the rear upright and bracket, stripping the lag screws. Is the only repair for this damage to drill out the holes in the bracket and install larger lag screws? If so, what type of screw should I be looking for (galvanized, zinc-coated, stainless-steel?), and what size? The #14 screw is the largest I can find in stores. Could drilling through the inside wall of the floor frame channel and then using #14 2 1/2-inch lag screws solve the problem? How should I reseal the bracket?
J. Larsen, Mosinee, Wisconsin
It would be difficult for me to provide proper direction without actually viewing the damage caused by the misuse. A lot depends solely on how robust the floor structure is on your motorhome. If there is enough “meat” left in the good wood at the same screw location, then the obvious first attempt would be to go to a larger lag screw. A #14 wood screw is significantly smaller than what I term a “lag screw.” Take care not to redrill the holes too large for the newer lag screw. Going to a longer lag probably will not be advantageous, since the thickness of that floor member will rarely be wider than a 2-inch piece of lumber at best.
I would suggest using stainless-steel lag screws, 1/4-inch in diameter, if possible. Zinc-coated screws would be my second choice. If necessary, you also could go the distance and install 3/8-inch lag screws, though it may be necessary to drill larger holes in the aluminum bracket.For sealing, I’d use Eternabond double-face sealing tape behind the bracket, but I’d also squirt a bit of silicone sealant into the lag holes before installing each screw. Take care not to get silicone on the surface where the Eternabond tape will stick.
Depending on the brand of your motorhome, it may be possible to gain access to the floor void from underneath the coach by cutting a hole in the bottom of the subfloor. If this is easily accomplished, consider installing new wooden “cribbing” blocks inside the floor runner. Again, it would take a detailed inspection, but if this is doable, I’d opt for bolts with “T” nuts and lock washers instead of lag screws.
{loadpositionEndBlurbHouseCalls}