
Pump Problem
Dear RV Doctor:
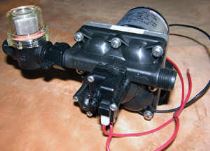
I have a SHURflo 4.0 Smart Sensor water pump in my motorhome, and I get an air lock in the line. I have had the fittings tightened, and it still has to burp the air out to run right. It reoccurs in minutes when not in use. It doesn’t make a difference whether the pump switch is on or off. If I leave the pump switch on, the pump will start running without turning on a faucet. It will run until a faucet is turned on and the air is bled off. The pump will become hot if I do not turn on the water. I have no water being pumped out when this happens. Do you think that the water could siphon back into the tank, allowing the air to get in the line?
Don Whitaker, Decatur, Arkansas
It’s quite possible your Smart Sensor is indeed allowing air into the system. It’s probably more evident when you switch from city water to the onboard source via the water pump. Unlike other SHURflo models, the Smart Sensor pump was manufactured without a backflow preventer in the discharge fitting. I would suggest you install an aftermarket check valve (backflow preventer) directly to the outlet side of the pump and see whether that helps. Perhaps the addition of an accumulator will help as well. I just tested the company’s new 4008 pump, and it performed wonderfully. It’s very quiet and is self-priming. If all else fails, perhaps an upgrade to the new 4008 is in order. Also, the 4008 pump eliminates the requirement for an accumulator.
Oven Operation
 Dear RV Doctor:
The Suburban oven in our 2004 motorhome is acting up. The pilot lights normally, and when the control is turned to a cooking temperature, the flame grows and the signal to light the burner seems to be received as the main burner comes on. So far so good; it appears to be working. The problem is the oven heats only to a certain point (not even 300 degrees, according to a thermometer) and then the main burner goes out, acting as though it has reached the set temperature. It seems to me the problem is with the safety valve/control unit or the sensor, so I started looking around for a replacement part. A few dealers have told me I have to buy a whole new range/oven control unit. Visiting Suburban’s Web site did not shed much light, except that if there is an “A” after the model number, it is a mercury-free unit. Could this be retrofitted?
Gord Scott, Edmonton, Alberta, Canada
From your description, it sounds as though the safety valve is functioning normally, assuming the delivery line pressure is set correctly. Any professional RV service facility can quickly and easily set the propane pressure for you.
With correct pressure, here’s what happens when you set the thermostat to any cooking temperature (assuming the oven pilot flame is lit). The pilot flame becomes slightly larger and begins to heat the thermal bulb (or a thermocouple in a non-mercury valve) attached to the safety valve. This appears to be occurring in your unit now. This thermal bulb, when heated by the pilot flame, expands a bellows in the safety valve and allows the propane to flow through the valve and on to the main burner, where it is ignited by the extended pilot flame. This results in a delay between the time when the oven thermostat is first set to a desired temperature and when the main burner actually ignites.
Now, it is possible that you have a faulty thermostat (main oven control valve). But first be sure the temperature sensor inside the oven is clean and free from cooking oils, oven cleaner, grease, etc., before condemning the thermostat control. Your problem may simply be a fouled temperature sensing probe in the oven. A coated probe can send incorrect info to the oven thermostat control. If the thermostat is faulty, however, the thermostat and temperature sensor must be replaced as a single unit, since an integral capillary tube connects them. Your first task should be to clean the temperature sensor in the upper reaches of the oven.
It’s also possible the oven safety valve is the culprit. The flame sensor probe (thermal probe) at the oven pilot is an integral component of the safety valve and must be replaced as a single unit, like the thermostat and its temperature sensing probe.
All this may sound a little confusing, but a certified RV service tech should be able to quickly diagnose the problem with a few measurements and a couple of operational tests. So, clean the temperature sensor probe and have the LP pressure verified, keeping in mind further diagnosis still may be required. I don’t believe it’s plausible, or even possible, to replace a mercury safety valve with a non-mercury valve without drastically modifying the range. And it certainly is out of the realm of the do-it-yourselfer.
Windshield Worry
Dear RV Doctor:
I have a 2001 Four Winds 35-foot Type A motorhome that has a two-piece windshield. I am having problems with the windshield coming out of the seal when I take the motorhome on a trip and it gets torqued a little. This has occurred three times. Are there any solutions to this problem, such as a different seal? I’m going broke resealing the windshield!
Jeff Leslie, Crawfordsville, Indiana
All of the instances I’ve seen with two-piece windshields popping the seal have been attributed to a warped front cap. In other words, the fiberglass or plastic cap originally was installed in a stressed position. On paper, the windshield pieces should fit perfectly with the designed front cap, but somehow during production, the cap can be torqued a bit or tightened down in a stressed position. The obvious weak point is the two glass pieces, which eventually are tweaked enough by the wracking and twisting of the body and frame that one corner pops out of the seal.
I’m not aware of any specific aftermarket seal that can eliminate this from happening. I have, however, seen some talented body shop technicians trim the cap opening or shim the front cap to eliminate the abnormal stress it is under. This seemed to prevent the glass from popping out of the seal more often than not. Careful measurements by an experienced body technician can reveal whether this is causing your windshield problem. Perhaps a little shaving of the cap in certain areas and shimming where necessary will eliminate the twist that’s affecting the windshield.
{loadpositionEndBlurbHouseCalls}