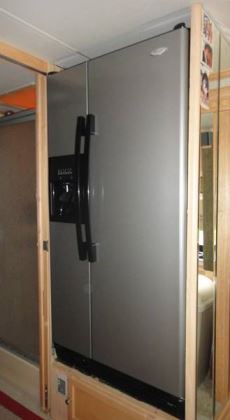
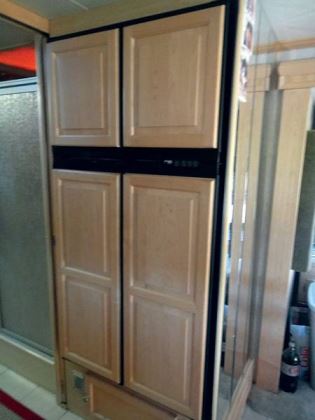
A step-by-step guide to replacing your existing RV refrigerator with a 120-volt-AC residential model.
By Bill Hendrix, F761S
July 2012
| Before … |
| After … |
 |
Now that warmer weather is upon us, if you’ve noticed that your gas-electric absorption refrigerator isn’t cooling as well as it once did, you have some decisions to make. You can replace the entire refrigerator with a new one or have a new or rebuilt cooling unit installed. These choices normally do not require modification to the cabinet, and you retain the same storage volume.
Another option that has become more prevalent among motorhome owners recently is to install a residential refrigerator. This may or may not save money, and it may or may not increase the storage volume. You will have to determine what size residential refrigerator will fit into the existing cabinet space or in the space you can create through some modification of the cabinet area. If you frequently boondock, a 120-volt-AC-only refrigerator will necessitate a larger battery bank and an appropriately sized inverter, or you will be running the generator a lot. Finding space for additional batteries and a high-capacity inverter may present another challenge. If you spend the vast majority of your time with an electrical hookup, running the generator during those infrequent dry camps or times in transit might be acceptable.
The first thing to consider when deciding on a residential refrigerator is the amount of cabinet space available. This may restrict you to the exact cutout of the old refrigerator. However, many times additional space can be gleaned from adjacent cabinets, so you may be able to increase the height or width. The cabinet depth, however, will normally be only 24 inches to 26 inches. Another consideration is how to secure the refrigerator doors during travel. Many residential side-by-side models have substantial handles that can be secured with a bungee or a strap made of hook-and-loop fastening material.
The more popular sizes of RV refrigerators have heights of 55, 60, 63, and 65 inches, with widths of 24, 33, and 36 inches. The refrigerator owners manual should provide the specs. Even knowing the exact dimensions of your existing refrigerator, you should still take precise measurements of the cabinet area and allow for any additional space available. By looking online or visiting a local retailer, you can find out which residential refrigerators are available within the dimensions you have determined.
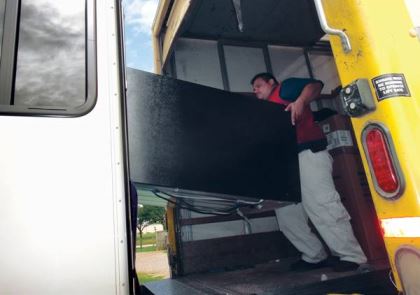
Next, you must determine how you will remove the old refrigerator from the motorhome and bring in the new refrigerator. Many RV doors are wide enough for smaller refrigerators to pass through if the doors and hinges are removed. Again, this will require some measuring. Larger refrigerators will need to be brought into the motorhome through a window or through the windshield. RV windows usually are easy to remove and reinstall, but removing and reinstalling a windshield requires the work of an experienced technician.
After selecting the replacement refrigerator, it is time to remove the old unit. RV refrigerators normally are held in place by a couple of screws at the top, frequently behind a trim piece, and a couple at the bottom, sometimes cleverly concealed. In the rear, accessible through the lower outside vent door, larger screws typically secure the lower right and left corners of the refrigerator. Look in the installation instructions or call your RV manufacturer if you have difficulty locating the screws.
Turn off the propane at the tank and disconnect the propane connection. Plug this line at the refrigerator end or at the source connection, but be sure to soap-test the plug when you turn the propane back on.
Disconnect, tape, and tie the 12-volt-DC wires. To cut the power to the wiring, remove the fuse on that line. Install a blown fuse in that slot or leave it empty and label it to indicate that the fuse should not be replaced. Unplug the 120-volt-AC cord. If the 120-volt receptacle will interfere with the space needed for the new refrigerator, it can be relocated. If you have an ice maker, turn off the water or close the valve and disconnect the line. The old refrigerator is now ready to remove.
Seldom will the refrigerator be resting on the motorhome’s floor, so some maneuvering will be necessary. A smaller refrigerator can be moved by a couple of people, as the weight will be 150 to 200 pounds. The larger, wider ones, often weighing more than 300 pounds, will need some additional support. Several online RV forums have articles that detail such installations, and one such article relates to building a dolly of the appropriate height so the refrigerator can be slid onto the dolly for removal and the new one placed on the dolly to install in the cabinet. A universal furniture dolly could be modified in height for the occasion, or a motorcycle jack also might work. When setting up your apparatus, be sure to protect the flooring. It is very easy to crack a tile or mark carpet with a dolly or other supporting device.
 If you decide to remove the old refrigerator and bring in the new one through a window, keep in mind that RV windows often are held in place by a clamp ring on the interior. Remove the screws and gently push the window from the inside while your assistant secures it from the outside. The sealant around the window may make this difficult, but gently prying in several places should do the trick. Treat the window with respect, as twisting the frame could break the window or damage its air seal. Place a piece of carpet or packing blanket over the opening to reduce friction and to protect the frame from being damaged or the new refrigerator from being scratched.
Once you’ve cleared the window from the frame, this would be a good time to remove the old refrigerator’s doors, hinges, shelves, and anything else to lighten the load. (Removing the doors is a good idea from a safety standpoint and may even be required legally before disposing of it.) With support in front of the refrigerator — one person pulling from the front and one pushing from the back — carefully slide the box onto the dolly and maneuver it toward the selected exit.
Now you can modify the cabinet as necessary and remove any baffling and insulation in preparation for the new refrigerator. The side vent door is not a watertight opening, and it’s possible that water damage may have occurred in that immediate area. If you discover that the cabinet floor has been weakened, it must be repaired before the new refrigerator is installed. This is the most convenient time to make such repairs.
Schedule the new refrigerator delivery and enlist the help of the delivery people to remove the old refrigerator and to insert the new one through the opening. (A generous tip usually is in order for such assistance.) It also is helpful if you can park the motorhome in a location where the delivery truck can back up straight to the door or window opening, thus reducing the amount of vertical lifting required. Some of the larger home improvement stores will haul away the old refrigerator for you. It may be advantageous to remove the doors and all of the interior parts from the new refrigerator to make it a bit lighter and to prevent damage to the doors or interior parts. If removing the door is not practical, at least remove all the interior parts and secure the doors with a strap to prevent them from swinging open while you are maneuvering the unit into the motorhome.
 Once you have the new refrigerator inside the motorhome, you can do some precise measuring to fine-tune the cabinet opening and determine how to anchor the refrigerator. This would be a good time to plug the new refrigerator into an outlet to make sure it is functional. Don’t install the doors until the refrigerator is in the cabinet. The old refrigerator had an air seal around the perimeter of the cabinet so air from outside could not commute through the side vent or roof vent to the living compartment. It would be advisable to seal these outside vents, but do this a little later, as you will need these openings to help secure the new refrigerator. The residential refrigerator should exhaust the heat out the bottom front, so you will not need the outside vents for condenser cooling. When making your refrigerator selection, be sure this is the case.
If the new refrigerator has an ice maker and the old one did not, a fresh water supply line will need to be installed. The most convenient connection can be made through the lower side vent opening. A shutoff valve should be installed near the water source.
When the refrigerator is placed in the cabinet opening, it would be best for the refrigerator case to rest against stop blocks at the rear, preferably a pair near the bottom and a pair near the top. You will have to do some measuring to determine the dimensions. Install the stop blocks so the refrigerator is positioned a few inches from the exterior wall and to prevent any movement to the left or right.
One method of securing the refrigerator is to install two straps to the top of the box that extend to the rear and can be fastened to the roof vent (or upper side vent) opening. Another pair should be fastened to the bottom of the box to extend to the rear and be fastened to the lower side vent opening. Another pair of stop blocks should be placed at the top rear to prevent any vertical movement. These can be placed through the roof vent opening after the refrigerator is in position. This is just one suggestion, as there may be other methods to anchor the refrigerator better suited for your application. This is where a little field engineering can come into play. Whatever securing method you choose, the refrigerator must be held in place well enough to allow no range of movement while traveling. Even if, for whatever reason, you never intend to move the RV, the next owner may have different plans. If the new refrigerator has bottom rollers, make sure you retract, remove, or block them to make the installation secure. Now you can remove or block off the roof vent and the side vent door.
With all the preparations done, place the refrigerator on the dolly, maneuver it in front of the opening, and gently slide it all the way to the stop blocks. From the roof, secure the top straps to the frame of the roof vent opening and install the vertical stop blocks. Insulate the opening and close off the roof vent with a piece of sheet aluminum and weather-tight sealant. Secure the bottom straps to the frame of the side vent opening, make the ice maker connection, and plug the refrigerator into the electrical outlet. Install a foam block the size of the side vent opening for insulation and seal with silver tape or other appropriate sealant. This should be an airtight seal, but it also must be accessible if the need arises. Replace the side vent door. If a window was removed, reinstall with new sealant and put the doors back on the refrigerator. If you have an ice maker, don’t forget to turn the water back on.
Last but not least, break an old habit and read the operating instructions for the new refrigerator. It is possible that you will learn something new.
Selecting An Inverter
If you plan to operate the new refrigerator using an inverter, you have some homework to do.
First, you will need to determine whether the refrigerator will operate on modified sine wave (MSW) electric from the inverter or will require an inverter that produces pure sine wave electric. It is possible that some components in a refrigerator could become disrupted or damaged when supplied by MSW power. Check the specifications for the refrigerator and consult the salesperson or the manufacturer to determine whether the appliance will experience any problems operating on MSW.
Once you’ve selected a refrigerator, you will need to find out how much electric it requires to operate. The refrigerator’s data plate will provide information about its electrical wattage load. However, the information supplied is for running loads. Most technicians will double the running load when calculating the inverter size needed for the starting load of an induction motor. The more features that the refrigerator has — auto-defrost, ice maker, ice crusher, ice dispenser — the more power is required of the inverter. The typical running load for a 12-cubic-foot refrigerator is 275 to 400 watts; for a 16-cubic-foot refrigerator, 380 to 600 watts; and for a 20-cubic-foot refrigerator, 420 to 800 watts. As you decide what size inverter to purchase, you also must consider any other loads that draw electricity from the device and the capacity of the available battery bank. Another option would be to install a new inverter that’s dedicated to the refrigerator, thereby not disturbing other wiring.
There is a good chance that you will need some professional assistance going down this path, but first review the following articles that have appeared in Family Motor Coaching. They should provide answers to many of your questions: “The Balance of Power” by Gary Bunzer (January 2012); “Inverters” by Mark Quasius (December 2011); and “12-Volt-DC Batteries and Charging” by Brett Wolfe (September 2011).

