
Black Tank Cleaning
After we emptied our black-water tank, the gauge did not read empty. We figured some paper was hung up on the sensor. A friend passed along an inexpensive remedy to try before going through the hassle of giving the tank a thorough cleaning. With a little water in the tank, dump one or two bags of ice down the toilet and take the motorhome for a good ride. The ice banging around in the tank should dislodge paper and other waste from the sides of the tank, allowing the sensor to work properly again.
June Whyte, F297161
Naperville, Illinois
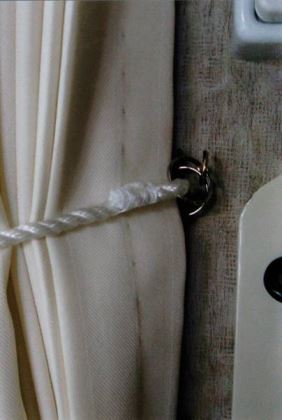
Curtain Tiebacks
The curtain tiebacks in our motorhome were too large and included big knots in them so that they’d fit. They were wearing out and dirty. So, I purchased 2 yards of white cording and a package of metal rings. Using hobby cement glue, I looped the cording through the rings, applying glue under the end, and wrapped the end with white string. The glue dried clear. This was an inexpensive solution and it fit perfectly.
Arlene Chiarolanzio, F181694
Florham Park, New Jersey
 Shoe Storage
Storage in all RVs is at a premium, so I began looking around our motorhome for a new place to store shoes and other items that need to be by the front door. The back of the copilot’s seat seemed a logical location. Using a purchased cloth shoe holder also seemed a logical choice. However, the challenge was to install the shoe bag without putting any holes in the leather seats. I already had covered the seat cushions with velour for comfort when traveling in hot weather. Using the leftover material from that project, I cut a piece the width of the back of the chair (plus 2 inches for hems) and the length of the back of the chair (plus 6 inches). I cut the shoe bag in half, using only three rows of pockets; sewed the shoe bag to the velour material at the top; and hemmed the material to the sides of the bag. I then cut three pieces of 1-inch elastic and sewed the elastic pieces across the side from the shoe bag to the existing seat cover, making sure the lowest piece of elastic was below the armrests. I slid the entire piece over the seat, tucking the extra length of velour material behind the cushion to hold it in place. I now have storage near the door for shoes, an extra towel, hats, etc.
Kris Osborne, F404622
Box Elder, South Dakota
{loadpositionEndBlurbTips}