
A dash-mounted display puts handy information within easy view.
By Mark Quasius, F333630
February 2016
Many newer cars and trucks have a small window within the rearview mirror that displays compass and temperature information. That works well for a car or light truck, but motorhomes typically don’t have a rear window, or if they do, it’s back in the bedroom. Some coaches still use a mirror-type system, which can be beneficial for monitoring passengers. But the temperature display in a rearview mirror is quite small and hard to see from the copilot’s seat. Plus, it’s powered by the ignition circuit, so it isn’t active when the coach is parked.
Motorhome owners also have the option of buying a wireless system that is designed for home use. Many such systems use wireless sending units that require batteries to communicate with an LCD display inside the RV. The units vary in size from a small, compact display to one that is large and easy to see. Most likely they will be placed on a table or counter, and they are better suited for camping than for driving.
I chose a compass-temperature system manufactured by American Technology Components Inc., based in Elkhart, Indiana. I’ve installed these products in my motorhomes in the past, and I wanted something larger and easier to see than the small display that was in our current coach’s dash entertainment system.
The System
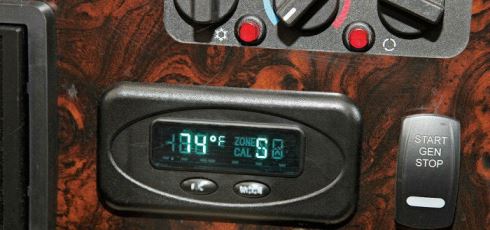
American Technology makes audio/video controls, lighting, and other accessories that are installed as original equipment by many RV manufacturers. Its products include the ATC Dash Mount Compass and Outside Temperature Display. The green vacuum fluorescent display mounts in the dash, although a ceiling mount pod also is available for locating the unit under a cabinet or front TV. The unit displays both the outside temperature and the compass heading. When the temperature has been above 40 degrees and drops to below 37, the display warns of potentially icy road conditions. If the temperature already is below 40 when the vehicle is started, the system assumes that the driver is aware of the temperature, and the ice warning does not activate. An attractive plastic bezel snaps over the display to hide the mounting screws.
A remote compass module connects to the display. The compass provides accurate heading information once it is calibrated, which is an easy task. And once calibrated, the setting is stored in memory so there’s no need to recalibrate when power is removed. The unit also can be calibrated for linear deviations that will change with longitude. A temperature probe sensor can be mounted to a convenient location and connects to the dash display via a long cable. The moisture-proof sensor and weatherproof connectors ensure reliable operation.
The display module receives power via a wire that connects to a constant hot supply, as well as a ground wire and a wire to an ignition-hot source. A fourth wire connects to the dash lights to allow dimming of the display. The unit monitors the ignition circuit, so the device is active only when the ignition key is on. However, when a coach is parked and the unit is in sleep mode, a simple touch of a button will display the compass and temperature readings for 120 seconds.
The Installation
First, decide where each component will be placed. Obviously, the display must be easy to see — typically on the dash to the right of the driver. When no dash space is available, ATC’s overhead mounting pod is an option. That was the case in my previous coach, so I placed the overhead pod right below the front TV, which made the display easy to view from both the cockpit and living areas. However, in my current motorhome, I had enough room on the dash, so I mounted the display in the center area where the radio, GPS, and rearview camera monitor are located.
The compass module must be mounted horizontally where it can receive a clear magnetic signal. I placed it on a wooden platform behind the copilot’s dash area near other electronic components, such as the keyless entry controller. Finally, I mounted the temperature probe to some steel framing in the front cap area. I wanted a secure location where the probe would not be damaged and would receive fresh airflow when traveling.
I decided to eliminate the key switch. Instead, I tied the unit to the radio power switch. This way, when the engine is off, we can see the display from within the coach without having to get up and press the sleep mode button.
I began by masking off a portion of the dash with blue tape and marking the size of the rectangular hole needed to mount the display unit. I used a multitool to cut the hole to a size slightly smaller than specified, and then I used a hand file to enlarge the hole as needed to fit. I reasoned that it was easier to make the hole larger, but not so easy to make it smaller once it was cut. After sliding the display module into place, I drilled the small holes that hold the display to the dash panel, installed the screws, and placed the trim bezel over the display.
I used a self-drilling hex-head screw to mount the temperature probe to the framework by the generator. I ran the wiring harness from the probe through the firewall and connected it to the display. I used plastic wire loom to further protect the harness from damage. I mounted the compass unit in the copilot’s dash area near the other components, fastened it to the plywood shelf with a pair of small screws, and connected its wiring harness to the display module.
Finally, I connected the main power harness to the display. I ran the ground wire to an existing ground stud behind the dash and ran the 12-volt hot power lead to a fused circuit in the fuse panel below. The dash lights wire was tied in to the existing dash lights circuit so that the display would dim during night driving. Lastly, I connected the wire intended for the ignition circuit to the radio power switch.
Everything powered up just fine. The temperature display gave an immediate accurate reading. The only step left was to calibrate the compass. Driving the coach in a 90-degree left turn plus a complete 360-degree clockwise turn took care of that. The display can be calibrated for various lines of magnetic deviation so that an accurate reading is possible at extreme ends of the country or when traveling in Alaska.
The display is bright and easily can be seen in the coach when camping. Switching off the radio power darkens the display when guests are sleeping in the front area and helps to conserve battery power while dry camping.
All in all, we are quite pleased.
American Technology Components Inc., 2905 LaVanture Place, Elkhart, IN 46514; (800) 238-2687, (574) 262-1258; www.atcomp.com.