

These checklists will help ensure that your motorhome maintains adequate stopping power.
By Mark Quasius, F333630
September 2016
The August issue of Family Motor Coaching contained an article titled “Understanding Air Brakes,” which explained the components of air brake systems and how they operate. Now we turn our attention to testing and troubleshooting such systems.
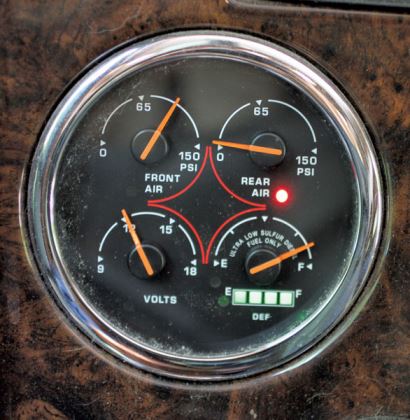 |
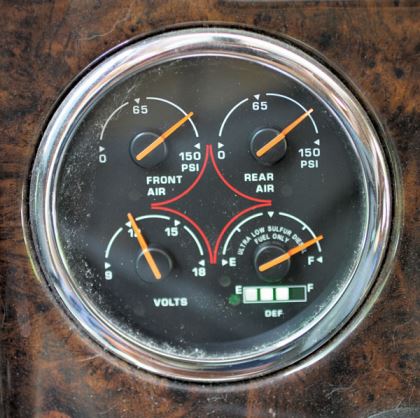
After the wet tank is drained, the air pressure gauges should indicate full pressure in both tanks. After the primary tank is drained, the rear air gauge should read zero, while the front air gauge should indicate pressure is being maintained. |
Checking The System
- Pump the brake pedal and observe the air pressure gauges. Stop pumping the brake pedal around 80 psi and start the engine.
- Run the engine at high idle until the air dryer purges, then shut off the engine.
- Find the yellow 1/4-inch air signal line that runs from the air compressor governor to the air dryer.
- Disconnect the 1/4-inch yellow line from the air dryer. At this time there should be no air coming out of the line. If air is coming out of the line, the air compressor governor is not functioning properly and needs service.
- If air is not coming out of the 1/4-inch line but is coming out of the air dryer, the air dryer is malfunctioning and needs troubleshooting and repair. Install an air dryer bypass kit so that you can drive the motorhome to a service center.
- Bleed the system pressure to zero by fanning (repeatedly pressing and releasing) the brake pedal until both the front and rear gauges read 0 psi. Using two wrenches, loosen the fitting from the steel-braided hose at the air dryer inlet fitting. Use one wrench to stabilize the fitting on the air dryer and the other wrench to loosen the fitting.
- Place one wrench on the air dryer outlet fitting; use the other wrench to loosen the fitting on the nylon air hose that supplies air to the wet tank.
- Install the air dryer bypass fitting, connecting one end to the steel-braided inlet hose and the other end to the nylon output hose. Use two wrenches again to tighten the fittings.
- Start the motorhome and check the fittings for leaks. The air gauges should now be increasing in air pressure.
- Make sure both air gauges are reading 70 psi or less. If the gauges read higher, bleed the system by pumping the brake pedal.
- Start the engine and run at high idle (1,200 rpm or higher) until the air dryer purges in the back of the motorhome.
- Never reach into a wheel well or crawl beneath the motorhome when air tanks are being drained. If you can’t safely reach the lanyards with your awning hook, use jack stands or a similar method to support the vehicle.
- Turn the key to the “off” position to stop the engine. Then turn the key to the “on” position so that the gauges will function. Do not start the engine.
- Determine the lanyard or petcock locations. There should be three of them, one to each tank. Some tanks are split into two separate compartments, so there may be two drain valves on one tank.
- Drain the air completely from the wet tank, which should be identifiable by a clear or gray lanyard cable.
- Enter the motorhome and check the gauges. They should not read zero. This ensures that the check valve between the primary and wet tank is functioning properly.
- Completely drain the primary tank, which should be identifiable by a green lanyard cable.
- Check the air pressure gauges again. The rear gauge (primary system) should read zero and the front gauge (secondary system) should not read zero. This ensures that the check valve between the primary and secondary tank is functioning properly.
- If either of these valves is not functioning as it should, take the motorhome to a service center to have the valves cleaned or replaced.
- Completely drain the secondary tank, which should be identifiable by a red lanyard cable.
- Check the gauges again. Both gauges should now read zero.
- If significant moisture was found when draining the tanks, it’s time to have the air dryer serviced.
- Make sure all of the petcocks or drain valves are closed, and restart the engine. Run it at a fast idle until the air dryer purges. The system should now be ready for operation and both gauges should read approximately 110 psi.
- If air pressure is less than 80 psi, start the engine and allow pressure to build up. Then stop the engine before continuing.
- Turn the ignition key to the “on” position to enable the air pressure gauges and low-air alarm system. Do not start the engine.
- Place your foot on the service brake and release the parking brake.
- Pump the brake pedal and monitor the air pressure gauges. Once the air pressure drops to 60 psi or below, the low-air-pressure alarm should sound and a red light will illuminate on the dash or in the pressure gauge itself.
- Continue pumping the brake pedal. Once the pressure drops to 20 psi, the yellow parking brake knob should pop out.
- If the alarm does not sound at 60 psi or the spring brakes do not actuate, the brake system should be serviced.
- Manually drain the air tanks.
- Run the engine at fast idle. The air pressure should increase from 50 psi to 90 psi in less than 3 minutes.
- The air governor should unload the compressor at a minimum of 115 psi and a maximum of 135 psi.
- Fan the brake pedal to drop the air pressure to 80 psi. If the governor is functioning correctly, the pressure should begin to rise.
- Continue fanning the brake pedal. The low-air-pressure alarm should sound at approximately 60 psi.
- Build up a full head of air pressure and switch off the engine.
- Release the spring (parking) brake.
- Apply full brake pedal pressure and hold.
- Hold this pedal pressure for at least 2 minutes. The air pressure should drop no more than 3 psi per minute. Excessive pressure loss indicates the brake system has a leaky fitting or component. Note that this assumes the air-ride suspension is fully inflated and is no longer using chassis air to inflate the air bags.
Safety First
The August issue of Family Motor Coaching contained an article titled “Understanding Air Brakes,” which explained the components of air brake systems and how they operate. Now we turn our attention to testing and troubleshooting such systems.