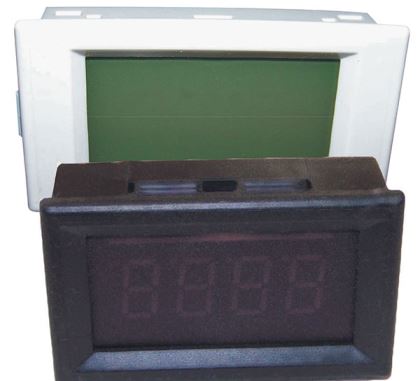
Digital devices measure incoming voltage and battery state of charge.
By Bill Hendrix, F761s
March 2018
Inexpensive digital voltmeters can help RVers avoid costly repairs. An AC meter monitors incoming voltage from a campground, alerting you to insufficient voltage, which can damage sensitive electrical appliances such as air conditioners. A DC meter indicates whether the RV batteries are properly charged, and such information can prolong battery life. This article provides an overview on how to install such digital voltmeters.
![]() First, though, a reminder: Always check for reverse polarity at the shore power receptacle before plugging in the landline. Gary Bunzer, the RV Doctor, has produced an FMCA video that explains how to ensure a safe electrical connection to a shore power receptacle. To watch, visit goo.gl/ckfb8d.
First, though, a reminder: Always check for reverse polarity at the shore power receptacle before plugging in the landline. Gary Bunzer, the RV Doctor, has produced an FMCA video that explains how to ensure a safe electrical connection to a shore power receptacle. To watch, visit goo.gl/ckfb8d.
Most experts agree that the safe threshold for running voltage-sensitive appliances is above 105 volts. Operating an air conditioner at 90 volts could lead to a very high repair bill. But many RVs, especially those with 20-amp or 30-amp service, do not have a voltage display. The installation that follows involves a motorhome with 30-amp service. RVs with 50-amp service usually have more refined systems with AC and DC voltage and amperage readouts available. To add voltage/amperage meters on 50-amp service, two meters are needed — one meter for each leg of the 50-amp service.
AC and DC digital meters can be purchased online for about $7 to $15. Most are approximately 1.5 inches by 3 inches. The displays are available in various colors; finding matching AC and DC meters is a bit of a challenge.
For a person with reasonably good mechanical skills, adding a voltmeter should not be a difficult task. First, consider a convenient place to mount the meter so that it can be viewed easily, such as in an overhead cabinet adjacent to the monitor panel.
A word of caution: Before doing any work on the 120-volt system, unplug the landline, turn off the inverter, and take the generator off of auto-start.
After purchasing a meter, make a paper cutout for the exact size hole you need. Use this as the template to make the hole in the cabinet. The meters do not have a large flange, so the cutout must be accurate.
For a voltage-only AC meter, you need access to a 120-volt terminal. This might involve running a Romex cable all the way to the electrical breaker panel or tapping into a nearby duplex receptacle box. I was able to use the microwave oven outlet, as it was in a nearby cabinet. To be code compliant, an electrical outlet box must be installed to house the rear of the AC meter and the wire connections.
Since I had an easy path to the breaker box, I elected to use a combination voltage and amperage meter. This involved running a 16-gauge wire pair from the meter location down to the breaker box where the induction pickup coil was installed on the 30-amp main. I gained access to the breaker box wiring (making certain the 120-volt system was disconnected) and loosened the screw holding the wire on the 30-amp breaker. I removed the wire and placed the coil on the wire. I returned the wire to the 30-amp breaker and securely tightened the screw. I connected the coil leads to the 16-gauge wire pair from the meter.
The coil is provided with the combination meter. The coil measures all the 120-volt current going through the main 30-amp breaker and displays the amperage on the meter. Having the amperage number is not crucial as long as you know the approximate amperage of the major appliances and realize that a breaker will trip if you exceed 30 amps. Resetting the breaker is not a big deal unless it is the one on the service post and it is raining. Each appliance has a data stamp disclosing its wattage. Divide the watts by 120 volts to get the amperage number. (For an estimation, see the sidebar: Approximate Amperage Of 120-Volt Appliances.)
With your tools out, adding a DC voltmeter is a breeze. Such a device is important because many monitor panels do not accurately indicate the RV battery voltage. Batteries should not be discharged below a 50 percent state of charge. Deep discharging the batteries can severely affect their life, so batteries should be recharged before they fall below 12.2 volts (12.35 volts for gel cell).
For the 12-volt meter, all that is needed is a 12-volt wire pair from virtually any source. You can run a 16-gauge or 18-gauge pair all the way to the fuse panel, tap into a nearby light fixture, or find a pair at the monitor panel.
The DC meter wiring is not polarity-sensitive, so you cannot miswire it. If you are using a combination voltage and amperage AC meter, be sure the wires from the coil are connected to the terminal identified as “input voltage” or “coil.” The other terminal (or wires) is for the 120-volt supply and may be marked “current” or “AC volts.”
After the installation is complete, the 12-volt meter will display the battery voltage. Now plug in the 120-volt landline. The top line on the 120-volt meter will display the available voltage. Turn on a couple of AC loads and the second line (on a combination meter) will indicate the amperage being consumed.
If electrical wiring is outside your comfort zone, or if you do not possess the appropriate skills, have a qualified electrician do the work.
This is a very low-cost but worthwhile addition to your RV.

