
Flush away your fears by familiarizing yourself with wastewater components and performing regular maintenance.
By Mark Quasius, F333630
December 2019
Dealing with sewage likely will never rate highly on your list of RV chores, but it need not be a dreaded task. It helps to have a basic understanding of the wastewater system.
Most RVs have separate gray-water and black-water tanks. Water from the sinks, shower, and laundry usually goes to the gray system, while the black-water tank handles toilet water. This setup dates to the early days of RVs, when gray water legally could be dumped on the ground if necessary. Because gray-water usage was much higher, and the black-water tank filled much slower, the latter could go for much longer periods before needing to be pumped out or dumped.
Today, many campsites have full hookups, so the need for separate gray-water and black-water holding tanks isn’t as great. In fact, some luxury coaches, such as Newell, have just one large holding tank for both gray and black water. However, most RVs still come with separate gray and black tanks, which is important if you camp at a site without full hookups.
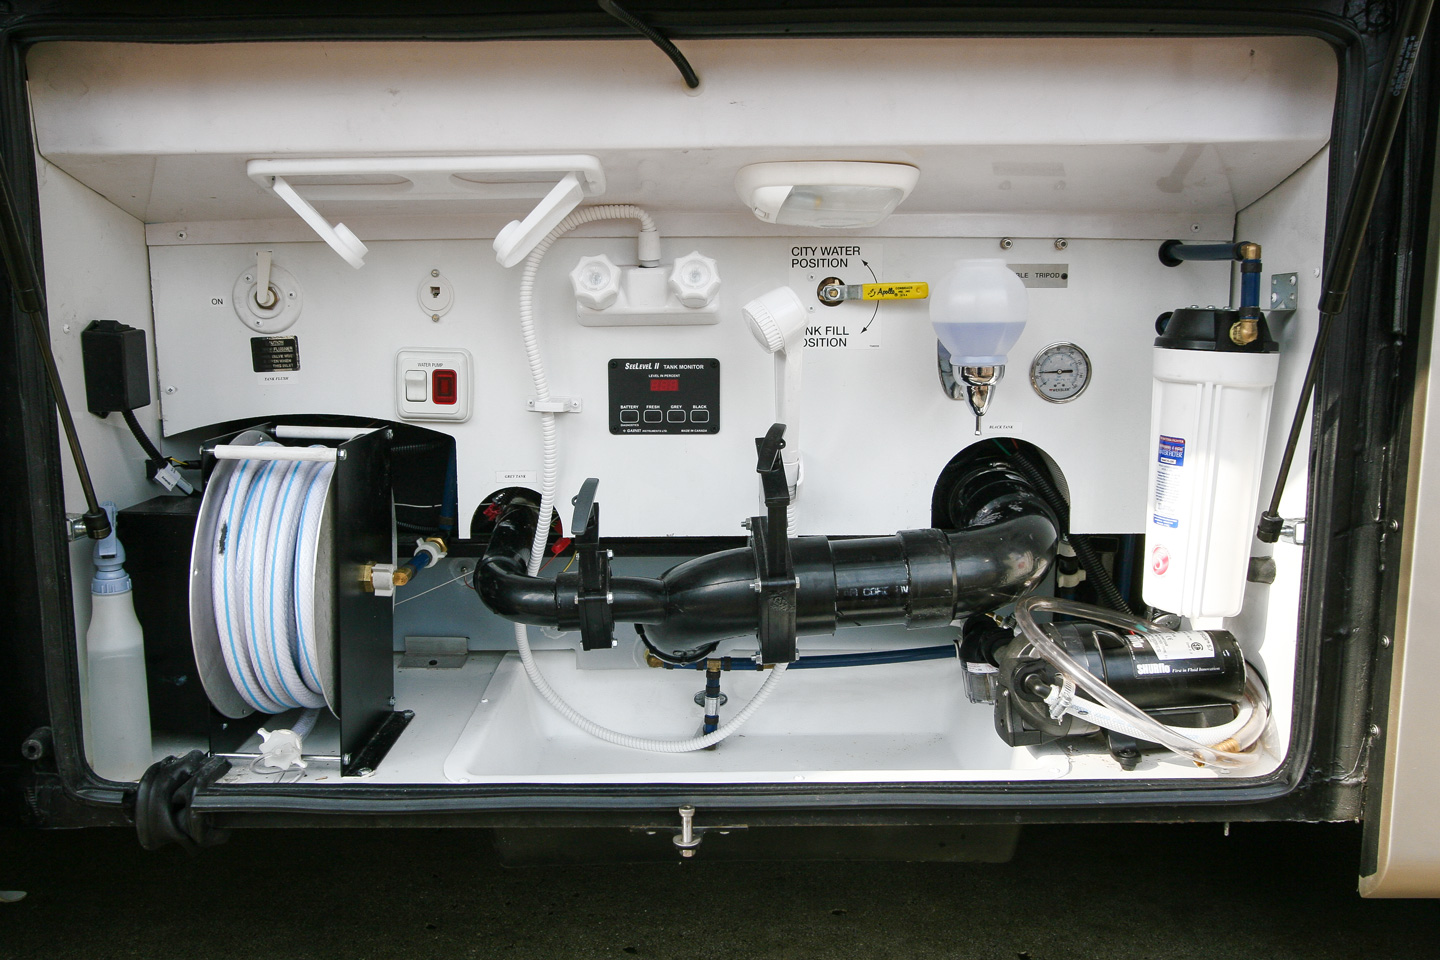
Tanks And Valves

Electric dump valves can be installed in places that are difficult to reach.
Holding tanks must be vented, because air needs to be displaced when wastewater is added to or removed from a tank. In addition, temperature changes cause expansion or contraction. Vent pipes are plumbed up through the roof of the RV. A vented cap of some sort is attached at the top to prevent debris and rainwater from entering. A venturi-style cap allows air to flow up and out, and thus evacuate odors that can build up in holding tanks. This can make a big difference when you flush the toilet and open its blade valve.

These electric dump valves operate with the flip of a switch.
Dump valves attached to each holding tank allow them to be drained. The blade-style valves permit the full flow of waste without plugging the valves. Black-tank valves utilize 3-inch piping; gray-water tanks may have either 3-inch or 1½-inch piping. The most common dump valve has a “T” handle to move the blade. You pull the handle to open the valve; push the handle to block the flow. Often, the valves are in the wet bay with other plumbing controls and connections. Sometimes, the valves may be in a location that is harder to access. In that case, the RV may be equipped with remote dump valves that can be operated from a more convenient location. The simplest remote valve is a cable with a handle. Also available: electric dump valves, which help to reduce concerns about frozen or broken cables.
Monitoring Systems

SeeLevel sensor strips attach to the outside of holding tanks, eliminating fouled sensors.
It’s important, of course, to know how full your tanks are. Typical tank monitors rely on a one-third measuring system. A monitor panel consists of a row of four lights for each tank. Pushing a button illuminates lights according to how full the tanks are. Tanks have sensor probes at the bottom; at the one-third-full level; at the two-thirds-full level; and near the top. When fluid reaches a sensor, the appropriate light is triggered. You never know whether fluid is just below or just above a sensor, so a reading of one-third full could mean the fluid is just below two-thirds. The sensors also are susceptible to being fouled from sediment accumulating on the tank walls.

A SeeLevel display provides a percentage-full readout.
The measuring method has changed thanks to digital technology. The SeeLevel system of sensors attach to the outside of the holding tank, eliminating the issue of fouled sensors. The digital sensors provide a percentage-full readout, accurate to 3/8 inch, according to product literature.
Toilets
Unlike many residential toilets, RV toilets are designed to use minimal water. Water is plumbed directly to the fresh-water supply. When an RV toilet is flushed, a blade valve or something similar opens via a foot pedal or electric switch, and then closes as soon as the waste has passed through. Most toilets are mounted over the black tank, and only a small amount of water washes the waste through the valve.
In some cases — usually when the RV has a full bath on the far end and a half bath in a middle location — the toilet cannot be positioned over the black tank. In that case, a basic RV toilet won’t work. Instead, a macerator toilet, common in marine applications, is used. A macerator toilet grinds waste into small particles that pass through a 1½-inch drain line to the black holding tank. This method requires a bit more water, which can be a downside when dry camping, but the amount is not excessive. A macerator toilet allows for more flexibility when designing floor plans.

This sewer hose connector can be used with a threaded or nonthreaded pipe.
Hoses And Connectors
Next, we’ll focus on transferring waste from the holding tanks to the campground’s sewer connection or dump station. Typically, an RV’s gray- and black-water dump valves connect to a wye fitting that has a common output. Your system likely has a standard bayonet-style connector (unless you have a high-end, direct-plumbed sewer system). The connector has four lugs and can accept any standard RV dump hose. The hose has a female version of this connection, so you just push it on and give it a twist to lock the bayonet fitting into place.

With a clear-view fitting, you can see when the flush is clean.
Standard RV dump hoses measure 3 inches in diameter. Various lengths are available, the most popular being 10 feet and 20 feet. Some hoses have a right-angle head for easier access to the connection. Some hoses have male and female bayonet connectors, and can be used as extensions.
Hose quality varies. Inexpensive hoses are thin, brittle, and prone to leaking. They also don’t flex well in cold weather and can crack during handling. You are better off spending more money to obtain a quality hose such as Camco’s RhinoFLEX or Valterra’s Viper. The latter is my hose of choice. Unlike basic vinyl hoses that have a wound wire inside to provide support, the Viper has no wire, so it can be crushed and deformed without damage. I’ve stomped on a Viper hose and it simply popped back into shape. Many hoses have a corrugated interior, which allows waste to accumulate in the grooves. But the Viper has a smooth interior, so waste flows through it without difficulty. The Viper is rated for use down to minus 20 degrees Fahrenheit.

Valterra’s Viper waste hose can be crushed without damage.
Instead of a 3-inch sewer “slinky” hose, which uses gravity to dump waste, some people opt for a smaller-diameter macerator hose. A macerating pump (fixed or portable) can move waste through the hose for 100 feet or more — and uphill — if necessary. Earlier macerator hoses were 1¼ inches in diameter, but Thetford’s newer Sani-Con Turbo macerating pump is much more powerful and has a 1½-inch hose. The macerator hose may be hard-plumbed to the macerator with a sewer adapter and dust cap on the output end, or it may be connected with camlock couplers to allow for various lengths using extension hoses. Some macerator hoses are equipped with canvas sleeves to help protect them from abrasions.
Operating Tips
Gray tanks are fairly trouble-free. In most cases, just dump them when they are full. If the wall of the gray tank develops a buildup, you may have trouble getting an accurate sensor reading. Even external digital sensors can give errant readings if the buildup is too thick. Generally, this is caused by too much grease being drained with the dishwater. Scraping the dishes prior to washing can help, but if the walls are already caked up, it’s time to use a cleaning product. I’ve used Happy Campers Extreme Holding Tank Cleaner with good results, but a number of sensor cleaning products can remove the crud.
Black tanks require a bit more care. Remember that only human waste and toilet paper should go in the toilet. No paper towels, facial tissue, or feminine products. Notify guests of this, too. Also, use the correct toilet paper. RV-specific toilet paper is sold, but any paper that dissolves quickly will work. To determine whether a toilet paper is appropriate, place a sample in a glass jar, fill it three-fourths full of water, screw the cap on tight, and shake the jar. If the toilet paper dissolves into a bunch of fluff, it will be fine. If it just gets soggy and retains its form, do not use it.
Problems also can stem from not using enough water or from allowing the tank to dry. The black-tank dump valve should never be left open; open it only when draining or flushing the tank. When the valve remains open, waste that falls into the tank will dry out and harden. This often results in the dreaded pyramid directly beneath the toilet’s opening. Keep the dump valve closed so that water remains in the tank. Also be sure to use enough water to cover the waste. The more waste and toilet paper in the tank, the more water that’s needed to prevent hardening.
Tank treatment chemicals help to dissolve waste. Many such products include enzymes to speed that process. The chemicals also help to prevent sludge buildup on the tank walls. Some chemicals marketed for RVs contain formaldehyde, which should not be used, because it kills bacteria that campground septic systems require to dissolve waste. Some campgrounds specifically prohibit the use of waste-tank treatments that contain formaldehyde. And the governor of California recently signed a law banning the sale and use of treatments with formaldehyde and other chemicals in the state starting in 2022. Natural products that do not contain formaldehyde include Happy Campers Holding Tank Treatment, Valterra’s Pure Power Blue, and Thetford’s Campa-Chem Natural and Eco-Smart products.
The best practice is to allow the black tank to get reasonably full, which keeps the sidewalls wet and prevents hardening of waste. Then dump the black tank, followed by the gray tank. As a rule of thumb, the black-water tank should not be dumped unless it is at least two-thirds full (adding fresh water, if necessary); this helps to ensure there’s enough volume and velocity to flush and drain the tank and hose thoroughly. If you have a long drive planned, fill the black tank to that level and add chemicals before leaving. As you drive, the sloshing action helps to rinse the tank walls and keep everything suspended. Once you arrive at your campsite, dump the black tank and rinse it out. It should be reasonably clean, and the sensors should function accurately.
That brings us to flushing. Flush wands — used to power wash the inside of a tank — are available at RV dealerships and supply stores. You connect the wand to a garden hose and insert the wand into the toilet. This can be a bit inconvenient, but you can purchase a spray head that mounts inside the tank. The spray head attaches to a female garden-hose connection that mounts in the wet bay. You hook up a garden hose to the connection, open the dump valve, and turn on the water until it comes out clear. You can see when this happens by installing a short, clear inspection tube with bayonet connectors. When using these accessories, be sure to designate a garden hose for wastewater. Keep your white drinking-water hose separate to prevent contamination from bacteria.
Eventually, the dump valves may leak, or they may become sticky and hard to operate. To help prevent that, add a bit of Thetford’s Drain Valve Lubricant to the holding tank. If a dump valve operates freely but it leaks, replace its rubber seals; they are inexpensive and available at any RV dealer. If the blade itself is pitted or sticking, you can replace the entire valve. It drops out after you remove four screws. If you replace the valve, it’s not a bad idea to coat it with silicone grease.
Nobody wants to experience anything like the black-water-tank fiasco scene from the 2006 movie RV. And you won’t, as long as you have a good understanding of how your RV’s sewer system operates and a willingness to tackle minor maintenance issues before they turn more serious.

The 360 Siphon RV Vent Cap improves holding tank ventilation.
Resources
Camco
(800) 334-2004
www.camco.net
Garnet Instruments (SeeLevel)
U.S.: (877) 668-7813
Canada: (800) 617-7384
www.garnetinstruments.com
Happy Campers
www.happycampersworld.com
Lippert Components
(360 Siphon Roof Vent Cap)
(574) 537-8900
https://www.lci1.com/360-siphon
Thetford Corporation
(800) 543-1219
www.thetford.com
Valterra Products
(818) 898-1671
www.valterra.com