

Battery Removal And Storage
I have a question about storing my motorhome for the winter. I will drive it about 3 miles from my home in western New York to an uninsulated storage facility. Winter temperatures can range from 30 degrees to below zero. I want to remove the house batteries. Should I do this before I move the coach or after I get to the storage site? Also, would you recommend removing the chassis battery, or should I just disconnect the battery cable?
Tom Penna
Via email
I always recommend removing all lead-acid and/or AGM batteries during any period of nonuse that involves sustained below-freezing temperatures. It’s okay to remove the RV batteries at home. Just be sure they are fully charged first.
Before you remove the battery cables, take a few photos of the connections. I even suggest labeling the cables before removing them. That way, you’ll be assured of knowing where each conductor connects when you take the motorhome out of storage. I get emails every season from owners who simply disconnected all the wires and cables, yanked the batteries, and have no idea which battery posts the wires and cables go to.
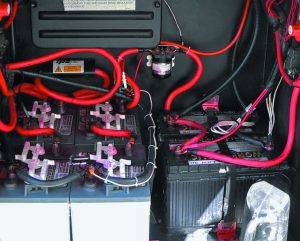
Take a photo and label the cables before disconnecting them from a battery bank.
Store the batteries in a secure, dry area in above-freezing temperatures. You’ll have to carefully insulate the terminal connections on the motorhome once you remove them from the battery bank. As you know, the alternator charges that bank of batteries while the engine is running, so tape and secure the loose battery cables to prevent them from shorting out against a metallic component. I’d tape both the exposed positive and negative cable ends to prevent moisture from advancing oxidation on them. Another option: Obtain old bicycle tubes from a bike shop and zip tie them over the cable ends/terminals. And indeed I recommend removing the chassis battery as well. Again, take a photo, label the cables, and insulate the cable ends. If you remove the house batteries beforehand, you’ll have only one battery to cart home!
No Fuel To Generator
We have a 7,000-watt generator in our Type A motorhome. I noticed aging cracks in the rubber fuel line that connects the steel fuel-tank line to the fuel pump. Concerned that this was a fire hazard, I replaced the rubber line with a new one, and now the generator will not start.
I removed the clamp and opened the steel line connection. No fuel. I then opened the line at the fuel pump. Still no fuel. I poured fuel into the rubber line and attempted to fill the line. The generator still would not start. I then checked the line at the carburetor. No fuel flow was evident, which was also the case when turnin
g the engine over with the line disconnected at the carburetor. The fuel tank is full. Is there a special priming method or something I need to do to get the fuel flowing again? It worked perfectly before I changed the line.
Doug Warnecke
Via email
It was a good decision to replace that rubber fuel hose. But I’m wondering if you replaced every single inch of hose. Many times, RV manufacturers use short sections of flexible hose when they run the fuel line from the top of the fuel tank, through perhaps a frame member, up to the steel tubing, and finally up and to the generator. Check to make sure you haven’t forgotten a short section somewhere. If there were cracks in the section you could see, undoubtedly there are cracks in any section hidden from view. The generator still may be sucking some air through a deteriorated hose somewhere.
Some generators are equipped with a fuel primer switch; others are not. Your owners manual will indicate how your model is equipped. The fuel primer switch usually is located right next to the start/stop switch on the generator itself. I’m not sure whether there also would be one on the remote start/stop switch; it’s doubtful. To be certain, I’d need the complete model number and spec number for that generator.
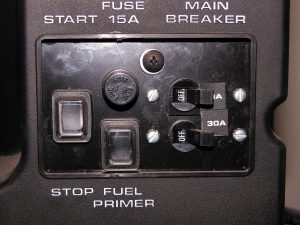
Some generators are equipped with a fuel primer switch.
Since there is no fuel whatsoever in the new fuel line you ran, it’s possible an air lock has formed that the fuel pump cannot overcome, even after you poured some fuel in the line. Try removing the fuel line directly at the carburetor, but use a separate fuel container. Stick the open end of your new line directly into that container. You also can draw a vacuum on the rubber hose where it connects to the fuel pump and draw fuel up to that point if necessary.
It’s also possible the fuel pump is not operating. Check its fuse and be sure it is electrically sound and that the pump is energized while you‘re attempting to crank the generator. This can be checked with a 12-volt test light or digital multimeter (DMM).
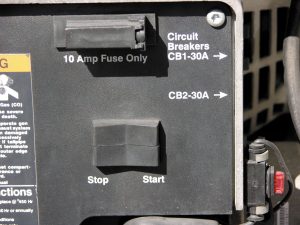
Other generators do not have a fuel primer switch.
Look also for clogged fuel filters in-line between the tank and the carburetor. In some cases, there may be two separate filters; one near the carb and one anywhere along the length of tubing/hose between the fuel container and the pump. If your unit is equipped with a separate fuel solenoid, check that it is operating properly.
If none of the above rectifies the situation, send me the complete model and spec number and I’ll dig a little deeper for you. If it worked before you replaced that hose, chances are it’s a simple matter of clearing the air lock.
Refrigerator And Furnace
My RV refrigerator has an electric setting to power it while traveling with the tow vehicle. When running the fridge on electric, does the RV have to be level just like it does when it’s operating on propane gas? Also, on a recent trip, my propane tanks got too cold to run our furnace. My stovetop and refrigerator were working, but not the furnace. What can I do in the future to avoid another uncomfortably cold night?
Debi Holt
Via email
RV refrigerator makers say it is okay to run the absorption refrigerator on 12 volts DC while driving down the road. Conventional wisdom further states the “must be level” rule applies only when the RV is stationary, regardless of the energy source. During travel, there’s enough jostling of the contents inside the cooling unit to keep the circulation going. I’d be hesitant, however, if your travel route takes you up or down steep grades for a long stretch of time, say, 30 minutes or more. In those rare instances, turn off the refrigerator until you get up or down the hill.
The one drawback when operating the refrigerator on battery power is its inability to cool down the contents if they are not already precooled. The wattage required to energize the refrigerator’s DC heating element can take a toll on the battery bank, and, in rare cases, it can stress the alternator on the tow vehicle. It’s always best to get the refrigerator and the contents good and cold on propane or 120-volt-AC electricity the day before you travel. Then switch to battery power when you take off. The 12-volt feature on any absorption refrigerator should be thought of as a cold “maintainer” only. It will not cool or freeze warm contents from a standing start when the refrigerator has been off for some time. In fact, if the refrigerator and its contents are already cold, you really don’t need to run the refrigerator at all while driving. As long as the door seals are intact, the contents will stay cold enough during a typical drive day. Then simply choose the propane or 120-volt-AC mode once you stop for the night.
As for the furnace not operating in cold weather, keeping the DOT cylinders as full as possible — 80 percent — during winter travel is recommended. Your symptom, indicative of outrunning the rate of vaporization, typically occurs only with sustained temperatures near or below freezing. Outrunning the rate of vaporization means the appliance is demanding more vapor than the container can provide at any given time. When opening the service valves, turn them counterclockwise slowly, and be sure the valves are fully opened.
Before you use the RV next time, I recommend having a certified RV service technician check and, if necessary, adjust the delivery line pressure, as well as the complete operation of the propane regulator. The tech also will perform a leak test. Something tells me the propane pressure is not dialed into the correct pressure setting. If the regulator is sized properly (based on the Btu demand), you should have no issues operating the furnace unless it’s extremely cold outside. Also remember that all propane appliances require an annual cleaning and servicing. You didn’t state what year your RV is, but it might also be time to have them checked. Again, a certified RV tech can perform this annual service.
Finally, a reminder to all readers: When sending me questions about an RV, an appliance, or any other component, it’s helpful if you include as much information as possible, such as the make, model, year, etc. You cannot send me too much info. The more, the better. Thank you!