
How to prepare your vehicle for its cold-weather layover.
By Mark Quasius, F333630
October 2020
Many people use their RV seasonally and store it during the cold-weather months. Cold can damage an RV’s plumbing system, so it is necessary to properly winterize the vehicle, especially if it’s kept in an area prone to freezing temperatures.
Winterizing work keeps RV dealerships in northern regions quite busy in the late fall, but it’s a task many RV owners can do themselves to ensure that their vehicle will be ready to roll when spring arrives.
Most of the effort expended on winterizing involves the fresh- and waste- water systems. Then it’s a matter of protecting the RV’s interior by giving it a thorough cleaning and removing items that could freeze or attract unwanted guests, such as mice.
Air Or Antifreeze?
Two methods commonly are used to winterize RV plumbing. One employs air pressure to blow moisture out of the system; the other pumps nontoxic RV antifreeze through the water lines.
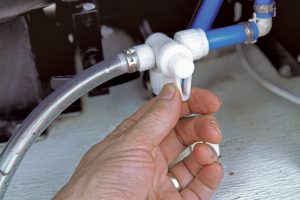
Using air has pros and cons. It’s simple. You connect an air hose from a portable air compressor to a blow-out fitting that attaches to the RV’s water connection or hose reel. You’ll need to obtain a Schrader valve adapter or a quick-connect air hose fitting for the air compressor hose in order to make the connection to the RV’s water supply. Compressed air forces water out of the system as various drains are opened. Air is free, so there’s no need to buy antifreeze. However, a pressure regulator is needed to prevent damage from excessive air pressure, which should be limited to around 25 psi. Be sure to use a clean source of compressed air.
Among air’s drawbacks: Although it pushes most of the water out, a bit of water remains in the lines as a result of condensation. Water can settle in a low spot in the lines, where it can freeze, expand, and cause damage. On a very simple system with minimal plumbing lines, that may not be an issue. But on more complex systems, air may not be enough to prevent freeze damage. That’s why in my home state of Wisconsin, where the winters are long and cold, many RV dealers use antifreeze.
Antifreeze is the best method to prevent freeze damage. In fact, Aqua-Hot calls for using antifreeze rather than air to ensure that water has been flushed from the domestic hot-water coils and valves in its hydronic heating systems. If any water remains due to condensation, it mixes with the antifreeze and is rendered harmless.
RV antifreeze differs from automotive antifreeze. RV antifreeze is nontoxic and is safe to use in fresh-water systems. It may freeze, but it does not solidify. Instead, it turns to slush, which does not expand and crack fittings or PEX water lines.
A drawback to RV antifreeze is that it’s messier than the air method and requires buying a few gallons every season. Also, it can cause water that runs through PEX water lines to taste bitter. To minimize that, blow the lines out with air initially, and then follow up with antifreeze. Once antifreeze has been thoroughly distributed throughout the system, reconnect the air compressor and blow it out; often, a large portion can be recaptured and used when you winterize the next year. Blowing out the antifreeze minimizes the water’s bitter taste. And, when dewinterizing the following spring, it won’t take as long to flush the system.
Getting Started
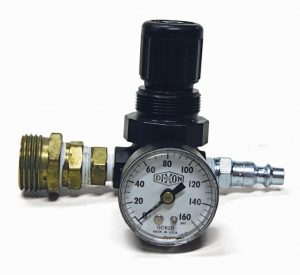
A pressure regulator.
Begin the winterizing procedure by draining the holding tanks. Use a tank flushing tool or in-tank sprayer head to thoroughly clean the black tank and remove deposits that can harden or cause odors during storage. Use a see-through sewer hose fitting so you can tell when the flush water is clear. Drain the fresh-water tank at the same time.
Before draining the water heater tank, switch off the 120-volt-AC circuit breaker that powers the water heater. It’s also a good idea to turn off the power switch on the heater itself (if so equipped) to prevent accidentally turning on the water heater’s electric heating element; it will burn out if turned on without water in the tank. Then, if the water heater has been on and the tank is hot, turn on the hot-water sink faucets and let them run until the water gets cold. Then turn off the water supply.
If you have a tank-type water heater, drain the tank by removing the drain plug. Open the pressure and temperature (P&T) relief valve near the top of the heater to allow air to enter the tank for a smoother drain through the lower drain port. Some water heaters, such as Suburban, have an anode rod to help ward off tank corrosion. The rod usually is part of the drain plug, so if a rod is present, be sure to inspect it for erosion. Suburban recommends replacing the rod annually, or when more than 75 percent of the rod has been consumed. Some tanks, such as Atwood’s aluminum tanks, do not have anode rods and are equipped with nylon drain plugs. Be sure to use the same style plug as was originally installed. Never install a steel plug in an aluminum tank; the dissimilar metals can cause the plug to weld itself into the tank threads, making it difficult to remove without damaging the tank.
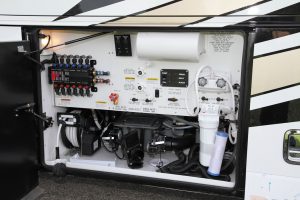
A ManaBloc system allows individual plumbing fixtures to be shut off manually.
Replace the drain plug and close the P&T valve. Then set the water heater bypass valve (or valves) to the bypass position. Depending on the RV, from one to three such valves cause incoming water to bypass the water heater tank. Refer to your owners manual for the exact procedure. Failure to bypass the water heater wastes money by pumping several gallons of antifreeze into the heater tank.
Low-point drain valves — one for the cold-water lines and one for the hot-water lines — are supposed to be at the lowest point of the RV. In many RVs, they are at the bottom of the basement utility compartment. But that doesn’t guarantee that all the water will drain out. The water must be forced out with air pressure or flushed with antifreeze.
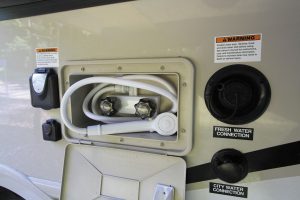
To use air to blow water out of the system, connect an air compressor to the incoming fresh-water connection on the RV. If the RV has a hose reel, blow it out also. Use a pressure regulator and adjust it so that the air pressure is between 20 and 30 psi. There is no need to use higher air pressure, even though the RV’s plumbing system is rated for that. Excessive pressure may cause a blast of water to spray in your face when you open up a sink faucet, or fittings or tubing may be damaged. Simple blow-out adapters are available at RV accessory outlets, and unless you buy a locking tire chuck adapter, they require holding a tire chuck onto the fitting, which can get tedious after a while. The adapters also require an assistant. An alternative is to visit a home-improvement or auto-parts store and buy a small pressure regulator with a gauge, a male garden hose fitting, and a coupler plug that fits your air compressor’s hose. This will make it much easier to blow out the system.
If a second inline water filter exists, it must be removed and a bypass tube inserted.
Begin by opening the hot-water and cold-water faucets inside the RV. Open the sink and shower faucets and close them once the water has been blown clear. Flush the toilet in the same manner. Blow out the drinking water faucet and refrigerator water dispenser, if so equipped. Don’t forget the outside shower faucet. When finished, open the low-point drains once again to allow water to exit, and then open the dump valves for the black tank and the gray tank to remove water that entered during the blow-out process. You can then remove the air hose from the RV, and you can empty water from the main water filter housing.
This is also the time to remove the filter element from the RV’s water filter. The RV may have multiple filters, including one for the drinking-water dispenser in the galley. And don’t forget about the refrigerator. If it has an in-the-door water dispenser and/or ice maker, there may be a filter in the refrigerator itself. Remove and discard the filters, and replace them with bypass tubes or plugs.
Dishwashers, laundry centers, and hydronic heating systems require more than air to ensure adequate protection against freezing. That means stepping up to antifreeze.
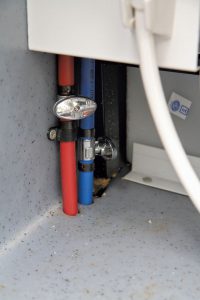
Low-point drain valves.
Using Antifreeze
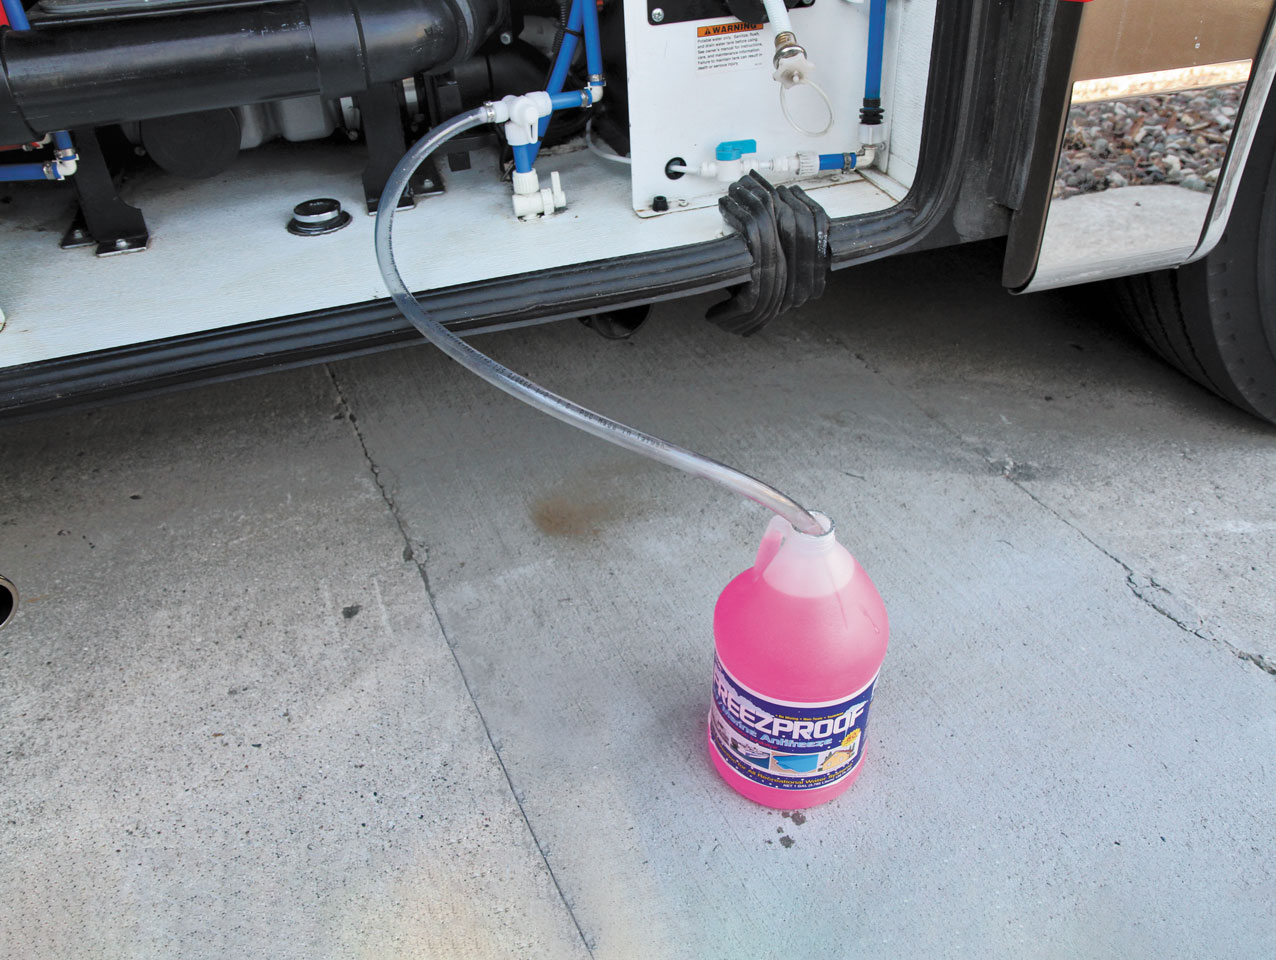
Once most of the water has been blown out, drop an antifreeze pickup hose into a jug of RV antifreeze. One gallon of antifreeze doesn’t go very far on my large motorhome, so my preference is to fill a clean 5-gallon bucket with several jugs of antifreeze and then insert the hose into the bucket to prevent running dry periodically.
Open the winterization valve to allow the water pump to suck the antifreeze from the bucket rather than from the fresh-water tank. If there is no winterization valve, disconnect the inlet line from the fresh-water tank to the water pump and install the antifreeze pickup hose. Be sure all faucets and fixtures are turned off before turning on the water pump.
Switch on the water pump. You should hear it run and cycle until it builds up pressure in the line. If your RV has a run/fill valve as many do, open it to the “tank fill” position. Hold it open for a few seconds to put a small amount of antifreeze into the fresh-water tank, then close the valve. This ensures that the line that feeds the tank is free of water. It also allows a bit of antifreeze to settle into the tank, where it can protect the tank drain line. Then, open the water heater bypass valve for a second or two, which ensures all the water is out of the short lines between the valve and tank.
Next, rotate through the RV’s sinks and shower and open each fixture’s cold-water faucet, one at a time, until antifreeze comes out. Start with the fixture farthest from the water pump and work back toward the pump, so that the longest fluid runs are the first to be filled with antifreeze. Repeat this procedure for the hot-water faucets. Do the outside shower in the same manner.
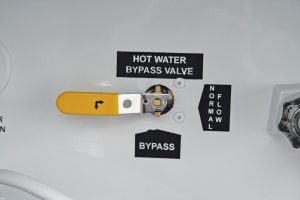
The hot-water bypass valve allows antifreeze to avoid the tank and go directly through the hot-water lines.
I keep an eye on the antifreeze level in my 5-gallon bucket so I’m ready to add more if needed. Antifreeze usage varies by RV. Some simple systems may get by with only 3 gallons, while larger RVs with hydronic heating systems, full laundry centers, dishwashers, and bath-and-a-half layouts may require as much as 8 gallons. You may be able to recover a large portion of it for use next year.
Once the sinks and shower are finished, pour a bit of antifreeze into the drains to seal and freeze-proof the P-traps and prevent gray-tank odors or sewer gas from wafting into the RV. About 3 cups should do it. Do this even if only air is used to blow out your system. Next, flush the toilet until you see antifreeze coming into the bowl. Keep a small amount in the bowl to prevent the seal from drying out while in storage.
Aqua-Hot And Appliances
RVs equipped with a hydronic heating system, dishwasher, or laundry center require a few extra steps. Hydronic heating systems such as Aqua-Hot or Oasis provide unlimited on-demand hot water by running cold water through a heat exchanger coil inside the boiler. The hot water also passes through a tempering valve as it exits the boiler. To ensure that water cannot damage the system, antifreeze must be pumped through until it exits a hot-water faucet on one of the sinks. Simply blowing out such systems with air is not recommended; freeze damage can result in expensive repairs. Once the hydronic heating system is winterized, the burner still can be operated to provide heat for the RV without damaging the system.
The water-supply lines of outside shower fixtures must be winterized.
If you have a laundry center, start a wash cycle to pump antifreeze into the washer’s drum. Refer to the washer’s owners manual for the exact procedure. I use a warm-water setting so that I am purging both the hot-water and cold-water lines, but a washer manufacturer may recommend two wash cycles, one hot and one cold. Once antifreeze begins to fill the drum, stop the cycle. Dial the washer control to the “reset” function, then select the spin cycle and turn it back on. The drain valve will open as the drum spins, and antifreeze will exit the drum and pass through traps.
The procedure is similar for a drawer-style dishwasher. Begin a cycle to fill the drawer, and then pause the cycle once you hear the antifreeze spraying in the drawer. Open the drawer; antifreeze should be puddling in the bottom. Close the drawer and cancel the cycle. The drain pump will engage and antifreeze will drain from the drawer and pass through the drain lines.
The water-supply line of refrigerators equipped with ice makers also must be protected. On the back of most absorption-style RV refrigerators is a water solenoid, which typically is connected to a 120-volt receptacle. Remove the hose from the solenoid valve and let it dangle behind the fridge. Sometimes this will drain water from the line, but water might still be in the mechanism.
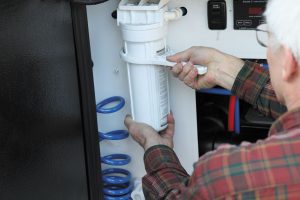
Before antifreeze is run through the plumbing system, remove the filter element from each of the RV’s water filters, and discard the filters.
Electricity poses an electrocution hazard, so attempt the following only if you have adequate knowledge and tools. Disconnect the wires from the solenoid and connect a power cord with female spade terminals to the solenoid. If the refrigerator has a 120-volt solenoid, plug the cord into a receptacle, which will open the solenoid valve so that air or antifreeze can pass through the system. If you have a 12-volt solenoid, connect it to a 12-volt power source. This should purge water through the ice maker. Use air, rather than antifreeze, during the initial blow-out process. Once blown clear, close the petcock, if so equipped, to prevent antifreeze from entering the refrigerator’s water line. The petcock typically is in the basement beneath the refrigerator. Place a towel in the freezer to catch water spray that leaves the ice maker.
Most refrigerators have a way to cycle the ice maker manually. You can do this while the system is under air pressure. It takes a few cycles to completely purge all the water from the system. Once finished, close the petcock to seal off that line before pumping antifreeze through the rest of the system. If you have a residential fridge with an in-the-door water dispenser, run lots of air through that to empty the bladder inside the fridge. It’s also possible to cycle the fridge while pumping antifreeze and run it until pink ice cubes appear in the bin. However, more antifreeze will be required, and it will take a while to remove the antifreeze taste next spring when you dewinterize.
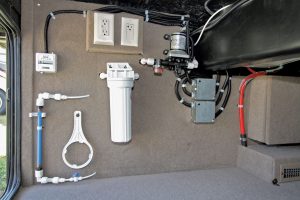
Many RVs have a diverter valve that connects the water pump inlet line to either the fresh-water tank or to the winterizing hose.
Final Tasks
One of my last steps is to remove the antifreeze from the plumbing, although this isn’t really necessary as long as water no longer exists in the system. As previously noted, by reconnecting the air hose and blowing the antifreeze out, quite a bit can be recaptured via the low-point drains to be used again next year. And removing the antifreeze minimizes the bitterness you’ll taste after filling the fresh-water tank in the spring.
Make sure enough antifreeze has passed through the shower and sinks to leave a fair amount in each trap, which prevents the traps from freezing and gasses from backing up into the RV. If in doubt, pour a cup or two into each drain. Then, drain the excess antifreeze from the holding tanks and put away the sewer hoses.
With the plumbing system ready for winter, attention turns to other areas. This is a good time to change the engine oil and service various chassis lubrication points. Acidic contaminants in the oil can eat away at the engine and cause pitting; changing the oil now helps prevent that, and there will be one less thing to do next spring.
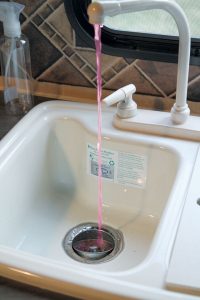
Pump antifreeze through each faucet, one at a time, starting with the fixture farthest from the water pump. Pump the liquid until a solid stream appears.
Check tire pressures and inflate them to the maximum listed on the sidewall. Protect the tires from ultraviolet rays and ensure that no electric motors (which produce ozone) are nearby. To prevent flat spotting, remove some weight from the tires by lowering the leveling jacks. To help ensure that tires parked on concrete or asphalt don’t dry out, place a barrier beneath them to prevent wicking of the tires’ natural lubricants. Plastic, plywood, or rubber floor mats may be used for that purpose.
If your RV has power while in storage, the converter or inverter/charger may be able to keep the batteries charged. If not, a small trickle charger with a float mode can be used. If you have no power, remove the batteries and keep them at home on a trickle charger.
Clean the interior and exterior of the RV while the dirt is still fresh. A clean exterior prevents contaminants from eating into the finish. Cleaning materials or supplies that might freeze should not be left in the RV.
Remove anything that might attract mice. Various products and methods claim to be effective at keeping the pests out of an RV, but they all seem to have mixed results. Setting traps works after mice have already entered; I’ve had good success with d-CON bait traps. Birds, insects, and spiders can enter via any opening. Mesh screens can be purchased that deter pests from propane furnaces, water heaters, and vent pipes.
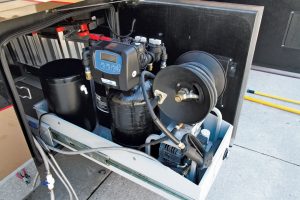
A water softener and pressure washer also must be winterized.
Mold forms in damp, enclosed areas. Keeping cabinet doors propped open allows them to breathe a bit. Unless your fridge is fed a constant supply of electricity, you’ll need to keep the doors cracked during the off-season to prevent mold. Most absorption-style RV refrigerators have latches that can double as vent locks to keep the doors open.
It may not be much fun, but the work you put into winterizing your RV will pay off in the spring when you’re eager to embark on new adventures.