
With good looks, easy-to-use controls, and the ability to operate it from anywhere using a smartphone, swapping out an old thermostat with an EasyTouch is an easy choice.
By Mark Quasius, F333630
October 2021
An RV’s heating and air-conditioning system requires some type of thermostat. Many of the latest RVs have multiplex networking systems that incorporate thermostat control with lighting, slideout operation, and other functions, but not every RV has this technology. Some contain basic wall-mounted thermostats that control just the HVAC system. Of those, some are fairly simple, while some can get a bit complicated. A few offer Bluetooth controls; fewer still offer a Wi-Fi control option.
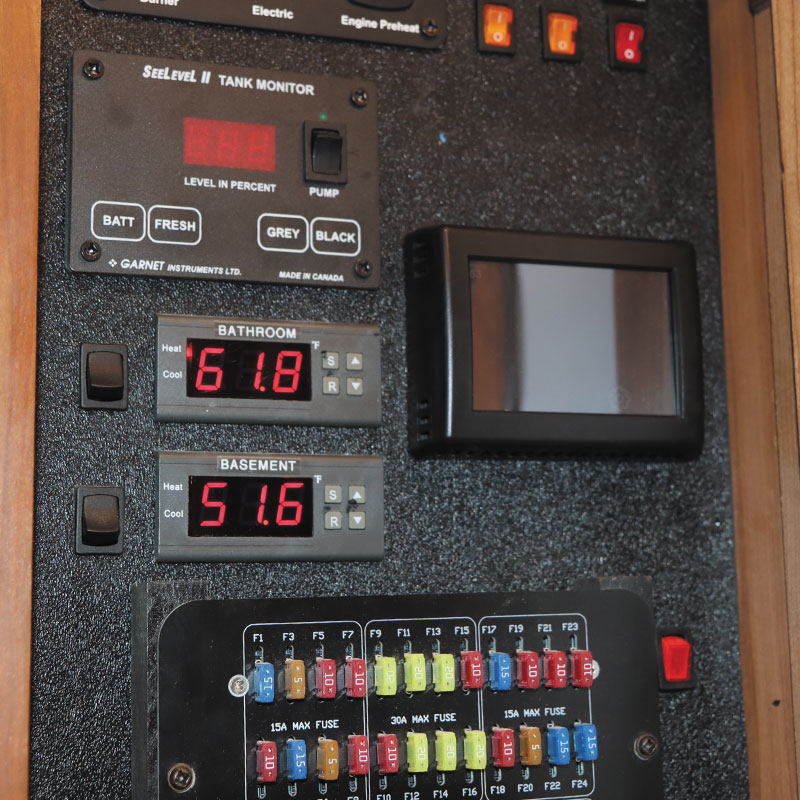
Our 2016 motorhome still had its original wall-mounted thermostat, which controlled the three rooftop air conditioners, the incorporated heat pumps, and the three zones of Aqua-Hot interior and floor heat. The thermostat was one of the somewhat complicated units that required a series of button pushes to toggle through the various settings. So, when I heard about Micro-Air’s EasyTouch RV thermostat, I was intrigued. I researched it, contacted the company, and ordered one to install in our coach.
Features
The EasyTouch RV thermostat has a lot of nice features, such as an easy-to-read color LCD touch screen with large, well-lit icons that control many functions — not unlike any smartphone touchscreen. For example, to change from the furnace to air-conditioning mode, you simply touch the furnace icon and then touch the snowflake icon. The same icon can be selected once again to change to heat pumps or fan-only mode. The thermostat employs the existing remote sensors used by the original thermostat and displays the ambient temperature in each zone as well as the set point temperature, which is easily changed by pressing the up or down temperature icons. The outside temperature and an array of other local weather data points are also displayed on the latest versions of the app and the thermostat.
The original thermostat was disassembled for access to the mounting screws on the backplate.
One of the biggest issues with conventional thermostats is that you need to manually switch between heating or cooling modes. Say, for instance, it’s warm outside when you go to bed, so you have the air conditioning running, but midway through the night it gets cold, and you need to switch to heat. Or, perhaps you leave the RV in the morning to do some sightseeing when it’s cold outside, but as the day goes by, the interior heats up and cooling is needed. One feature of the EasyTouch is auto mode, which automatically switches between heating and cooling to maintain a certain temperature. (Note: the Dometic CCC DuoTherm 5-button thermostat lacks this feature.)
The EasyTouch also offers Bluetooth capability, allowing you to access your thermostat through a free app on your smartphone. With a range of up to 50 feet, you can control the thermostat from anywhere inside your RV, or within a reasonable distance from outside the RV. The app mirrors the thermostat’s screen and operates just as though you were looking at the actual thermostat.
Beyond Bluetooth range, it is Wi-Fi capable. So, if you have an internet connection in the RV (via a router or cellular-based hotspot), the thermostat can be accessed from anywhere in the world where you have internet access, utilizing the same app. The thermostat automatically switches from Bluetooth to Wi-Fi if you move outside the range.
The screw anchors and break-away alignment bar.
You also can program your thermostat to send alerts to your smartphone if temperatures go beyond your high or low warning points. Every degree beyond the alert set point, you get a new alert until you do something about it. In the past, an RV owner had to rely on third-party software that would send a text or email warning when the temperatures in the RV exceeded a set range, and the only recourse was to quickly return to the RV to alleviate the problem. The EasyTouch allows you to do something about it remotely. If you receive an alert, you simply access the app to adjust the temperature in the RV.
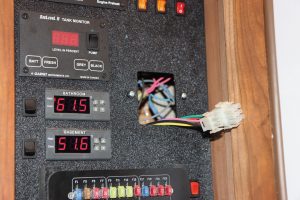
The existing wiring connectors fit the new thermostat.
Other features include day and night settings for dimming the thermostat’s display, home and away settings, and a scheduling system so you can enter temperature settings for different times of day. As Micro-Air develops new features and upgrades, they are free and can be received remotely in the thermostat and on the smartphone or iPad control via Wi-Fi.
Installation
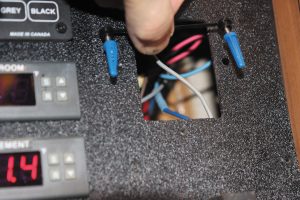
Installing the EasyTouch is a simple DIY project, as each model is designed to be a plug-and-play replacement of the existing thermostat. Our Entegra coach had a Coleman multizone thermostat that was intended to be mounted with keyhole slots. Theoretically, all I had to do was push up on the thermostat to remove it. However, I discovered it was screwed directly into the wall through the backplate, so I needed to disassemble the original thermostat to remove it. Once loose, I was able to pull it free, exposing the two connector plugs and the access hole.
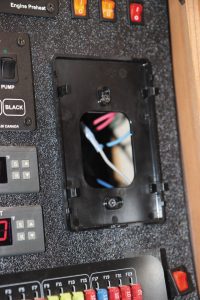
With the wiring connectors unplugged, the existing mounting screws were visible.
The new thermostat came with a pair of screws, anchors, mounting lugs, and a spacer to achieve the correct distance between the two mounting holes and the correct height/depth of the new screws. The idea is to drill two small holes in the wall, insert the screw anchors, fasten the mounting lugs via the screws, and then hang the thermostat on the lugs. However, our coach has a plastic panel in a cabinet that holds a number of control components, including the thermostat. Drilling the hole in the hard plastic panel wouldn’t allow the screw anchors to expand, and just screwing directly into the thick plastic didn’t seem like a very solid idea. So, I removed the panel and utilized machine screws with nylon lock nuts on the backside to mount the two lugs that the thermostat hangs on. The extra work to remove and reinstall the panel only took about 10 minutes, so it wasn’t a big deal.
Setup
Once I plugged in the connectors, the thermostat booted up and began to display information. It searched the system, found all three zones, recognized that it was cold, and immediately fired up the heat pumps. I then downloaded the app to my smartphone and set up an account. I also set up the Bluetooth access and paired it with my smartphone.
I continued with the setup, which can be done on either the thermostat or the app. The setup screen contained a number of icons, including the scheduling system, day/night mode, display brightness, and various other features. The first step was to select the DIP switches icon to set up the heat sources for each zone, which brought up icons for the furnace (Aqua-Hot in my case), air conditioners, and heat pumps.
I exited the setup screen and went to the main screen for zone one. I changed the heat pumps icon over to the furnace icon, and the heat pumps stopped and the Aqua-Hot’s heat exchangers started. I did the same for zones two and three. I tapped the up arrow a few times to raise the temperature setting; I noticed the temperature setting was red when heating was active, and white once the temperature was reached and the heat stopped. Once the zone reached its set point, I lowered the temperature quite a bit and selected the snowflake icon. The air conditioner kicked in after a short delay, and the temperature display changed from white to blue, which makes it easy to tell whether the system is heating, cooling, or resting, just by looking at the color of the display.
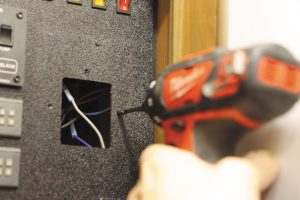
The author drilled mounting holes for the new thermostat.
If the heat pump mode is selected, the heat pumps attempt to heat the coach. If the temperature differential between the zone’s thermostat set point and ambient temperature is more than five degrees, the furnace takes over. Once the zone’s temperature reaches the set point, the furnace stops. When the temperature drops and the thermostat calls for heating again, the heat pumps start again. If the temperature falls more than five degrees, the furnace takes over to provide heating again. This feature mimics the gas heat override function of the original thermostat.
I also set the fan modes on each zone using a separate icon. You can set the fans to run at low speed, high speed, automatic, or not to come on at all with the furnace. The heating and cooling fan speed selections are stored independently, so once you set them you can pretty much forget about them.
I then went to check out the auto heat and cool mode. The auto mode icon appears as half a yellow flame and half a blue snowflake. The auto mode switches between heating and cooling automatically to maintain the desired temperature, with a two-degree wait period to prevent continual cycling between the two modes. Typically, the auto mode is necessary only when temperatures are moderate and swing between cool and warm. The system is set to switch between air conditioning and heat pumps, rather than the furnace, so it utilizes the campground’s power instead of burning your propane or diesel fuel. However, if you prefer to use the furnace rather than the heat pumps, the workaround is to simply go into the setup page and change the setting.
Observations
After using the system, I am quite impressed. The display is easy to view and simple to operate. No more toggling through endless menu selections to simply change between heating and cooling. The auto mode is super handy — just select the desired temperature and let the thermostat do its own thing. If I’m really lazy and don’t want to get up from my recliner, I can simply operate it from my phone or tablet via Bluetooth. I also can keep tabs on the temperature while I’m away to ensure our dog, Zeke, isn’t overheating, or that nothing is freezing in the coach on those cold winter days when it’s parked in our driveway.
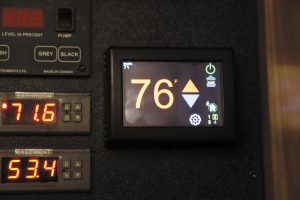
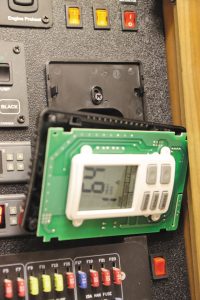
The EasyTouch controls all three zones of the RV’s Aqua-Hot heating system; shown here is zone two in heat mode.
I haven’t explored all the capabilities yet, such as the scheduler. However, this system is so simple to use that even the basic functions operate your HVAC system just fine. Our current basement heat has its own dedicated thermostat, but with a maximum of four zones on the EasyTouch, I can always add basement heating if I choose. The system is easily upgradable, both through app updates as well as thermostat enhancements.
With its easy installation, no service fees, excellent tech support, and an amazing selection of features plus released enhancements, the Easy Touch RV thermostat is one of the best upgrades I’ve ever made to our RV.
Further Info
Micro-Air, C13625 *
www.microair.net
(609) 259-2636
* FMCA Commercial Member