Family RVing Magazine
  • FRVA.COM
  • CONTACT US
familyRVing
  • in this issue
  • tech
    • Tech talk e-newsletter archives
    • more tech talk
  • Digital editions
  • towable guides
  • Classifieds
  • contact
    • contact us
    • advertise with us
    • media room
  • FMCA

Family RVing Magazine

Tech Talk: Left Out Not In The Cold: Part 2

September 1, 2023
Tech Talk: Left Out Not In The Cold: Part 2
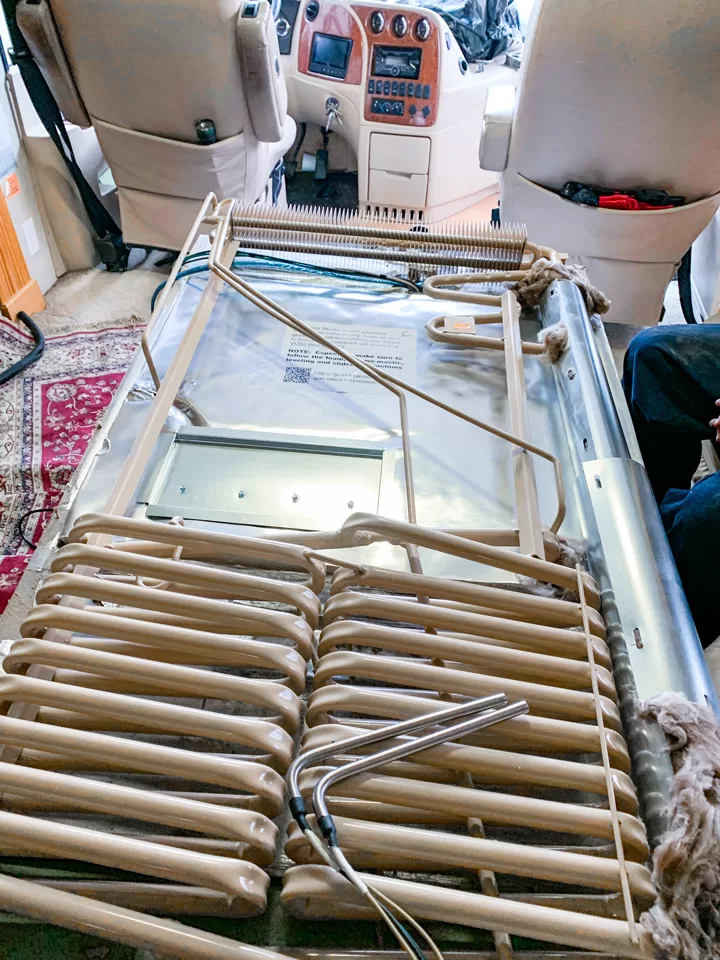
A new cooling unit, such as the author’s, may take up a lot of floor space before it’s installed. Be sure to plan and to lay out towels or blankets to protect both the fridge and the floor.

The second installment in a series of articles about RV refrigerator or cooling unit replacement.

By Steve Froese, F276276
September 2023

Last month I discussed the process of deciding whether to replace your entire RV refrigerator or just the cooling unit in the case of a failure. This month I will continue that theme but will assume that you have opted to go the route of replacing the cooling unit only. As I start to delve into the cooling unit replacement procedure, I will present this from the perspective of an owner following the written instructions. As a seasoned RV technician, I will also share tips. If you feel able to perform a replacement yourself, I recommend you first procure a new cooling unit and plan the work while you wait for all articles in this series to be published.

As indicated in the prior article, it is important to first determine whether the cooling unit has failed. If your absorption-type refrigerator simply will not power on or it doesn’t become cold inside when operating on only one of the energy sources, but works fine on the other (propane or 120-volt-AC power), it isn’t likely that the cooling unit has failed. Similarly, if the issue is that the refrigerator does not get cold enough, the solution may not be a cooling unit replacement.

There are at least three telltale signs that an absorption-type RV refrigerator cooling unit has failed: if you smell ammonia, especially around the back of the fridge; observe yellow crystalline debris and staining around the area of the flue tube and propane burner; or the flue tube heats up during operation but none of the other piping gets above ambient temperature. Some fridges will also generate a “no cooling” error code. If you aren’t sure whether you have a faulty cooling unit, seek professional advice before proceeding.

Cooling unit replacement is not a difficult job, but it does take planning and time. You don’t need to perform the work from start to finish in one session, but be sure to keep yourself highly organized as you go, as it does require removal and replacement of cabling and other components.

I highly recommend an “Amish” refrigerator cooling unit. These units are manufactured by Dutch Aire and have several significant advantages over original-equipment cooling units. The Amish units utilize thicker steel tubing and are hand welded. This avoids the primary failure modes of the original units, which most notably involve the tubing or welds. To my knowledge, there has never been a reported case of a Dutch Aire cooling unit experiencing a mechanical failure. Dutch Aire units come with a 3-year warranty, and you may purchase an additional 3 years. These cooling units are available from a variety of online retailers, two of which are “JC Refrigeration” and “RV Cooling Unit Warehouse.” Many retailers will also provide installation services if you are in their area.

The cooling units come in a cardboard box strapped to a wooden pallet. Before you confirm delivery of the unit, carefully inspect the packaging to make sure the item is not damaged. The cooling units come spray-foamed into the packaging, so damage is unlikely. When I picked up my unit, I spotted a large forklift puncture in the cardboard box. I thoroughly inspected the packaging and noticed a light scuff on the cooling unit tubing paint, but I determined there was no significant damage. If you have any concerns, be sure to make a damage claim with the freight company.

Identify a location inside your RV where there is sufficient space to lay the refrigerator down on its doors. You will also need to access all sides of the fridge as you work on it. Fortunately, my RV has opposing slideouts in the kitchen, so I had lots of space to work on the fridge once I pulled it out of the wall. Lay towels or blankets on the floor to protect both the fridge and the flooring. To avoid damaging door handles or water dispensers, you may need to add extra padding to your floor prep area. You may also choose to remove the fridge door handles to avoid damaging them.

Download the installation instructions for your make and model of fridge from the JC Refrigeration website (jc-refrigeration.com). These instructions are fairly comprehensive but lack some detail and information, so I will try to fill in the blanks via this article series.

If your fridge is in a slideout, you should also purchase the slide-out fan option, which is required for warranty coverage. If you have noticed the fridge fins icing up, you might want to purchase a fin fan kit. It is also a good idea to replace the 120-volt elements, cooling fans, and propane burner at the same time. These parts should be available from the above-mentioned retailers. Most of the cooling units are also available in kits that contain the heating elements and replacement cooling fans, so I recommend purchasing one of these.

As per the instructions, it is a good idea to take pictures of each step of the replacement process so you can refer to them during reinstallation. Also, as indicated in the instructions, resist the urge to reference online videos covering this procedure, as there is no way to verify accuracy.

Prepare your fridge for removal by following the downloaded instructions. This includes turning off the propane, unplugging the AC cord, disconnecting the water line if applicable, and disconnecting the 12-volt-DC wiring to the fridge. I would recommend capping the propane line with a 3/8-inch flare plug. This prevents debris from falling into the propane tubing while everything is disconnected, and it’s also safer in case propane leaks past the service valve. Locate the refrigerator’s 12-volt fuse and remove it prior to disconnecting the 12-volt fridge line. This will prevent the live 12-volt wire from shorting out and blowing the fuse.

As per the instructions, remove the fridge mounting screws on the inside and outside of the RV, as well as the freezer plate and fridge fin screws.

Carefully plan how you will move the fridge from the wall to the floor. On the outside of the fridge, double-check to make sure everything is disconnected that is supposed to be. Make sure you have an assistant to help with the “heavy lifting.” With your assistant holding the fridge on the inside of the RV, give a few good hard pushes on the back of the fridge from the outside. If all the screws are out, the fridge should move out from the wall. With the helper (or two helpers in the case of larger fridges) stabilizing and pulling from the inside, work the fridge out several inches from the wall. Go back inside and very carefully work the fridge out of the wall. Gently lay it doors down on your prepared floor area.

Proceed with disconnecting the fridge wiring as per the instructions. I highly recommend taking as many photos as possible, as it’s easy to become confused when reconnecting everything later. The steps for disconnecting and removing the cooling unit are comprehensive in the instructions. I recommend labeling the wires and tubing for later reconnection.

Next month I will continue discussing the replacement procedure. Should you find yourself performing a cooling unit replacement and run into any sort of difficulty where you are unsure what to do, please feel free to email me at techtalk@fmca.com.

Send your troubleshooting questions to Steve Froese at techtalk@fmca.com. The volume of correspondence may preclude personal replies. Not all responses will apply in every instance. Some situations may require a visual inspection and hands-on testing. If you choose to follow any procedures outlined in this column, first satisfy yourself that neither personal nor product safety will be jeopardized. If you feel uncomfortable about a procedure, stop and make an appointment with an RV service facility.

You may also want to consult the FMCA Forums (https://community.fmca.com) to see whether your question has already been addressed or, if not, to post it.


Recalls

Looking for the latest RV-related recall information? Visit FamilyRVingmag.com for a list of the most recent recalls issued by RV and component manufacturers. Or, to search for recalls, investigations, and complaints by vehicle year, make, model, and VIN, visit www-odi.nhtsa.dot.gov/owners/SearchSafetyIssues. NHTSA’s Vehicle Safety Hotline is (888) 327-4236.

rv refrigeratorAmish RV refrigerator cooling unitRV refrigerator cooling unit faillure
previous post
Mark Twain’s Hannibal
next post
News & Notes: September 2023

You may also like

Tech Talk: June 2013

June 1, 2013

Tech Talk: Any Way The Wind Blows —...

December 1, 2023

Recalls

April 17, 2019

Tech Talk: February 2018

February 1, 2018

Tech Talk: Battery Isolators — Part 1

March 7, 2022

Recalls

July 13, 2020

Tech Talk: December 2016

December 1, 2016

Recalls

June 3, 2020

Tech Talk: April 2011

April 1, 2011

Recalls

November 1, 2022


  • Facebook
  • Twitter
  • Instagram
  • Pinterest
  • Linkedin
  • Youtube

©2023 - Family Rving Magazine All Rights Reserved.


Back To Top