
Water System Sanitization
As an RV enthusiast for 30 years, I’ve seen many questions about sanitizing the fresh water system and how to get the sanitizing solution into the water tank. Whether a gravity-fill inlet is available or not, I’ve found what I believe to be is the easiest way get the bleach into the tank, plus it also sanitizes the filling hose.
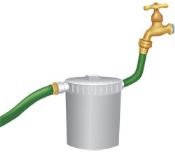
Once I figure out how much bleach is needed for the holding tank in question, I remove the filter cartridge from my Sears-type city water filter and pour the necessary amount of bleach into the canister. I then close the canister and hook it between the water source and my fill hose, which is connected to the RV. I turn on the water and fill the tank. After all the faucets and systems are cleaned and drained, I turn the water back on to flush everything out. Don’t forget to reinstall the filter cartridge when done.
Editor’s Note: For a solution of 50 ppm, add 1/2-cup bleach for every 30 gallons of water.
Donald R. Hubner, F243708, Oak Harbor, Washington
Air Brake System Check
Before taking the motorhome out on the road, most owners perform some type of pretrip inspection to make sure the fluids, tire pressures, lights, wipers, etc., are at the correct levels or working properly. The same type of check should be performed on your motorhome’s air brakes, if so equipped. Here’s how:
1. Have the motorhome parked on reasonably level ground. Block the wheels so the coach cannot move even with the parking brake off.
2. Start the engine and run until full air pressure is reached. Listen for the dryer to purge (approximately 120 psi).
3. Shut off the engine.
4. Release the parking brake by pushing in the yellow plunger (make sure the vehicle doesn’t roll, and do NOT apply the brake pedal). After the initial pressure drop, the system should not lose more than 2 psi per minute.
5. Apply the brake pedal firmly (the parking brake should still be in the off position). After the initial pressure drop, the system should not lose more than 3 psi per minute.
6. With the engine off, the ignition on, and the parking brake off, rapidly pump the brake pedal to bleed down the air supply. During this stage you should watch for the warning light and buzzer at approximately 60 psi; the yellow parking brake plunger should pop out at approximately 30 psi.
7. Restart the engine and build up the air pressure again. While building the pressure, check to see how long it takes to rise from 85 psi to 100 psi at “cruising rpm.” It should be less than 45 seconds.
Brett Wolfe, F252125, League City, Texas
{loadpositionEndBlurbTips}