This writer abandons the pleated shades in his motorhome in favor of new sun and privacy shades from MCD Innovations.
By Mark Quasius, F333630
 |
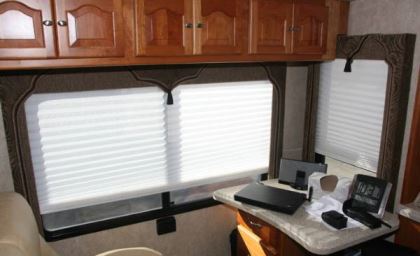
Many motorhomes are equipped with pleated day-night shades, which have two steps of shade material: a translucent sun-filtering day shade followed by an opaque privacy shade for nighttime use. They raise and lower via thin strings that frequently break, preventing the shades from operating. For many years this technology was the best available. However, new roller shades have been gaining ground recently, especially in high-end coaches. Our 2007 Allegro Bus originally was equipped with pleated shades, but after living with their marginal performance and need for frequent repairs, I decided it was time for an upgrade. For this, I chose shades from MCD Innovations.
MCD Innovations has a longstanding reputation for making quality products and backing them with great customer service. The company also is proud to display the “Made in USA” label on its products, and strives to have every component crafted to the highest standards.
Clearview Sunscreen
MCD products have a number of impressive features, but the one aspect that excited me the most was the ClearView sunscreen. During my research I found that not all sunscreen material is created equal. Many sunscreens are made with a two-over-two weave — two vertical strands laid together over two horizontal strands and then woven in such a fashion. This type of screen has variable degrees of effectiveness. It relies more on blocking the light than filtering the heat. When this screen is viewed straight on, it’s much darker than MCD’s ClearView screen, and when you attempt to look through it at an angle, it is extremely hard to see out of the motorhome. Some sunscreens incorporate inexpensive fiberglass screen threads, similar to those used for the bug screen on your windows at home.
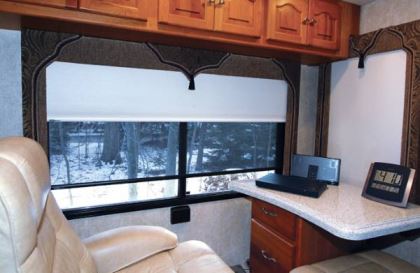
MCD’s proprietary ClearView screen material is very high-tech. MCD screens are made using a one-over-one weave and don’t include inexpensive fiberglass threads. This design makes it easy to see outside the motorhome when the shades are down, and the view remains clear even when looking through the shade at an angle. Yet, the unobstructed view does not detract from the shade’s ability to reflect heat. In fact, I tend to think of the material more as a thermal barrier than a sunscreen. MCD shades hang neatly without wrinkling or revealing dark streaks. Even though it may be nice and bright outside when looking through the MCD shade, it’s virtually impossible to see into the motorhome during the daytime hours. If it’s dark outside and the interior of the motorhome is lit, the perspective changes — you can still see out, but others can see inside. That’s why nighttime privacy shades are also used.
Shade Design
MCD shades can be configured in either single-roller (American Solo) or dual-roller (American Duo) designs. The American Duo dual-roller shades consist of one roller with solar screen material and a second roller with light-blocking privacy shade material. The shade rollers are manufactured and shipped as a complete assembly, including a mounting track, and are normally stacked vertically to allow the shade material to be positioned as close to the window as possible and to fit within narrow valances. For applications where dual shades are not desired, American Solo single-roller shades can be specified.
Each shade can be configured for either manual or power operation. The manually operated shades utilize the GlideRise IV mechanism. GlideRise IV allows the shade to be retracted by a tug on the hem rail. The shade will retract at a controlled rate without binding or slamming into the valance. If the shade ever needs to be adjusted, a knob on one end of the shade roller can be turned to change the rate of retraction. A second knob at the opposite end of the roller allows the owner to set the upper stop limit so that the shade is always easy to reach and will not become tucked up too high into the valance or hang too low. The GlideRise IV mechanism also eliminates having to deal with pull cords or roller chains and related issues.
Powering The Shades
MCD windshield shades require 12-volt-DC power routed through rocker switches to control both the day and night shades. MCD has a unique stop limit system with a safety feature that will allow full extension of the shade when parked or for nighttime privacy but only partial extension when the ignition is on. This safety feature prevents a runaway shade from fully extending while the vehicle is in motion should a rocker switch fail, but it allows the shade to serve as a full-width sun visor while in transit. MCD designers have even built in a safety retraction feature in the rare case of catastrophic motor/gearbox failure; should this happen, the shade would return to the fully retracted position without any input by the user.
The powered shades in the motorhome’s interior are operated wirelessly with remote controls. Each shade is connected to a 12-volt-DC power supply. The remotes are available in compact 2-channel units or a larger 14-channel controller. The remotes are so versatile that you can program them to operate one shade from multiple channels or multiple shades from one channel. You can even fine-tune and set both the upper and lower set limits of each shade directly from the remote controller without even touching the motor units in the shade.
Windshield Shade Installation
 The existing windshield shades on my motorhome were a pair of motorized visors connected to a scissors-type mechanism. The black material blocked the daylight, but the shades didn’t span the entire windshield, and many times the sun came through at an angle that bypassed the visors, rendering them useless. For evening privacy, drapes were used to wrap around the windshield. The drapes had little insulation value, and bright light was still able to pass through the material, so they weren’t room-darkening by any means. Plus, the cat liked to open them up a bit when crawling through to get to the windshield, so privacy was always somewhat iffy.
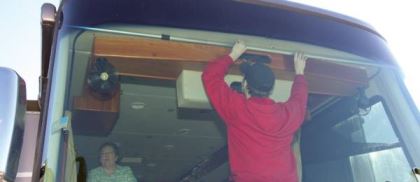
We began the installation by removing the drapes and their track. We also removed the power sun visors but left their wiring in place so it could be reused for the MCD shades. The one-piece MCD shade spans the full width of the windshield, so there are no gaps on either side or in the middle for light to penetrate. One roller contains MCD’s sunscreen fabric while the other holds a four-ply vinyl privacy shade (we chose beige).
Before placing the order, I took a shade width measurement to ensure the shade would fit properly into our windshield area. Instead of a tape measure, I used an extension pole. This pole could be adjusted to the desired length. As the pole was moved up and down along the windshield pillar trim, measurements could be checked to prevent binding and to ensure adequate coverage. The pole was then measured to obtain an accurate size. Once the proper length and drop had been determined, the shade could then be built to those specifications. Calling MCD’s technical support team can help you make sense of how to get the proper measurements for your windshield shade and can boost your confidence once you begin the project.
The MCD shade rollers are mounted to an extruded aluminum rail. This assembly is then snapped into a series of mounting clips that are screwed to the ceiling. For a full-width windshield shade, six clips are used. The clips are doubled up at each end to provide additional support for the extra-long shade assembly, with the remaining clips spaced evenly across the shade’s width. We held the empty track in place and marked the ceiling to ensure that each clip would be in perfect alignment. The clips were then screwed into place.
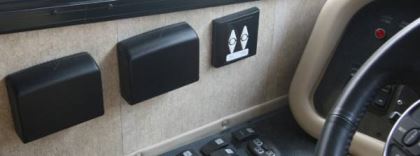
I used the existing wires from the two powered sun visors to operate the MCD shades. To do so, the existing amperage draw needs to be sufficient for the new product. There were two switches on the driver’s-side console to control each of the previous sun visors, and a third switch on the copilot’s side to control the passenger-side visor. I connected the sunscreen shade to the wires that originally controlled the copilot’s windshield visor and connected the privacy shade to the wires from the original driver’s-side visor. We also ran an additional wire from the ignition key switch to the shades to interface with the safety interlock system that prevents the shade from overextending while driving. Spade terminal connectors were crimped to these wires to make it easier to install the shade assembly or to remove it should the need ever occur. We lifted the American Duo dual-roller shade assembly into place and snapped the track into the mounting clips with a firm push of a screwdriver.
 Once the shade was in position, we plugged the spade terminals into the proper connections and began to program the shade. MCD windshield shades have two limit settings for each shade roller. One is used to set the upper and lower stop limits when the ignition is off. This allows the shade to fully extend for maximum privacy or sun control and is used when the motorhome is parked. The second setting is used when the ignition key is in the “on” position. The lower stop limit should be adjusted to approximately the midpoint of the windshield. This allows the driver to use it as a full-width sun visor but prevents the shade from going any lower while the ignition is on, another safety feature that MCD engineers developed.
A windshield shade is normally designed to ride down the windshield A-pillar trim in order to provide complete privacy and zero light penetration. This also supports the shade so that it doesn’t swing when the coach is in motion. In my situation, the trim pieces were narrow and had enough curve in them that the shades were not supported through the full length of travel. A simple fix was to remove the trim and add a piece of plastic to space them out slightly so that the shade would follow the trim from top to bottom. This slight modification was not even noticeable once completed, and the shades worked perfectly.
Cockpit Side Shades Installation
The original cockpit side shades in my motorhome were a pair of manually operated black-mesh roller shades that could be extended to cover part of the side windows. To extend these, it often was necessary to get up from the driver’s seat and pull down on the hem rail, which couldn’t be done while driving. A pull cord was used to retract them, which caused the shade to snap up forcefully and wrap tightly around the roller. The pull cord was usually stuffed inside the folded windshield drapes, so it, too, made for an unsafe maneuver when driving.
I removed the old side shades and began the installation of the new MCD shades. Two mounting clips were attached to each shade’s location to fasten them to the overhead cabinetry. I was able to access 12 volt-DC battery power from nearby sources and ran that power to the shades. The shades that covered the driver’s-side and passenger-side windows were MCD’s American Duo shades with both sunscreen and privacy rollers.
Over the entrance door I chose to install an American Solo single-roller shade with privacy material only. A Velcro-attached sunscreen shade made from MCD’s ClearView material was utilized on the screen door. Since the installation, MCD has introduced the Screen Door Pull-up Shade, which mounts to the inside of the screen door and allows the solar screen to be pulled up from its roller housing and hooked to clips on the top. This is even more convenient, because it’s easy to use and can be lowered while traveling to give you an unobstructed view out the door window.
MCD’s remote-powered shades are easy to install. Hot battery power is fed to the shade and can be accessed from a number of existing locations that have constant DC power. The shades themselves contain wireless receivers that pick up signals from any number of wireless controllers. We placed a two-channel wireless controller on the wall immediately to the driver’s left to control the driver’s-side cockpit shade. A second controller was located to the right of the copilot to control the shade on that side. A third controller was mounted immediately next to the passenger-side remote to operate the entry door privacy shade. Because the third remote still had one channel available, we programmed it to control all three privacy shades in the cockpit area, so that at the press of one button, all three privacy shades could be extended or retracted simultaneously. The final steps included programming the upper and lower stop limits for each shade. MCD also manufactures and supplies powered shades to integrate with Multiplex, Spyder, or Intellitec systems.
Living Area Shade Installation
In the living area we used a combination of manual and remote-powered shades. American Duo shades have the ability to mix either design in the same assembly, so we decided to go with GlideRise IV manually operated sunscreen shades but remote-powered privacy shades. That way it would be easy to just reach over and operate the sun shade when sitting in any area but still have the ability to operate the privacy shades with remote controls. We also chose to install manual GlideRise IV shades on both the sunscreen and privacy rollers in the bedroom rather than go with powered shades. In an area that small, it wasn’t necessary to power them, and it made for an easier installation by not having to fish electrical wires through the walls, especially to the two shades over the nightstands.
All of the living area shades were located in valances. We first removed the existing pleated shades. We then measured the valances with a short telescopic pole for proper width, and also made a note of how much drop we needed. Wiring was extended from nearby turret lighting to power the privacy shade motors, and spade terminal connectors were crimped to the ends. Mounting clips were then installed in the valances and we were ready for the shades. In my situation, the valances were a bit on the narrow side, and the shades would have rubbed against and bound up on the window frame. We removed the valances and added a bit of decorative drapery cord to space them farther out so that wouldn’t happen. The drapery cord matched so well you’d think it came that way from Tiffin Motorhomes. The shade assemblies were snapped into place, the wires connected, and we were ready to program the stop limits of the shades.
To set the stop limits on remote-powered shades, each shade must first be married to a remote control. When placing an order for MCD shades, you can stipulate which button/channel you’d like to control each shade and MCD will “marry” all the shades for you at the factory. Then all you will need to do is establish the final set-limit settings right from the controller. You can un-marry and remarry any shade to any controller button if you ever want to make changes. The system is very easy to learn and is extremely versatile.
Any shade can be added to any other controller or can be included in a group that is controlled by one button. While the cockpit side shades are controlled by a pair of two-channel controllers, I decided to utilize a 14-channel controller for the living area. This battery-powered remote can be mounted on a wall or left loose and used in the same manner as a TV remote from anywhere in the motorhome. Each shade has its own designated button, and I also added the cockpit side shades to that controller. Finally, every shade was programmed to an “All Shades” button so that every shade could be operated simultaneously with the push of a button.
The GlideRise IV manual shades were very easy to adjust, since they are preset at the factory. Every shade that MCD ships is first hung on a test rack, and the retract rate is adjusted until it is set perfectly. You shouldn’t have to readjust it unless you allow the shade to unwind from the roller before you install it. If you ever do need to make adjustments, it’s a matter of simply reaching up and turning a wheel on the end of the shade roller to change the retract rate. A second wheel knob on the opposite end of the shade roller adjusts the upper stop limit. By turning this wheel you can adjust the length of shade hanging off the roller when it’s retracted. MCD has now added the Tru-Trac system to its shades. This patent-pending innovation ensures that the shade will roll up straight every time, regardless of whether the motorhome is level.
Benefits
I verified the sunscreen’s effectiveness at minimizing heat penetration into the motorhome with a dual-probe digital thermometer. One probe was placed between the screen and the windshield while the other probe was placed inboard of the screen. I was able to observe dual temperature readings at the same time. On a softly lit day with ambient temperatures around 54 degrees Fahrenheit, I observed roughly a 24-degree difference in temperature between the two areas. When similar tests were performed on a dual-pane insulated side window, the difference was 17.3 degrees. On a sunny 90-degree day the temperature reading between the windshield and screen can be up to 50 degrees higher than the temperature on the inside of the screen.
Further proof of the insulating effectiveness of the shades was made apparent to me the morning after a very cold night when temperatures dropped to around freezing. When I raised the sunscreen shade, it felt as though a freezer was just opened. The sunscreen provided insulation from the cold air, just like it holds back the hot air on a warm, sunny day. I was very impressed with its beneficial energy conservation on both warm and cold days.
The ability to clearly see outside from within the coach, yet provide a good amount of daytime privacy, is unique to MCD’s ClearView sunscreen material. The overall quality of the product, the fact that MCD supplies more than 24 RV manufacturers, and that they are manufactured in the United States made my shade replacement project one of the best upgrades to my motorhome.
MCD has recently introduced the new ClearView II solar screen, which lowers the sheen or glare of the sun’s reflection off the material and allows even better outward visibility from all angles. The ClearView II screen is now standard on all OEM and retail customer products that the company sells.
MCD Innovations, 3303 N. McDonald St., McKinney, TX 75071; (800) 804-1757, (972) 548-1850; www.mcdinnovations.com.

