A do-it-yourself guide to help owners replace or repair the small actuators that move pocket doors and windows.
By Bill Hendrix, F761s
February 2014
Many large motorhomes and converted buses have electrically operated pocket doors and/or driver-door windows. The method used to move these doors or windows predominantly involves actuators that have been made to the RV manufacturer’s specifications, or stock automotive window actuators that have been modified to fit a particular application.
Many RV companies have gone out of business or been involved in bankruptcy reorganization, so it can be difficult for owners to find information about this type of equipment, and sometimes nearly impossible to find replacement parts.
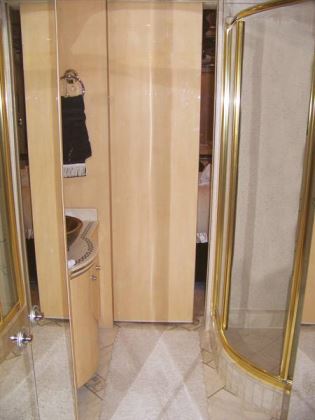
When a pocket door or window actuator becomes inoperable, the cause usually can be traced to one or more of the four main components: the switch, the controller, the motor, or the wiring. Of the four, the motor is the component most likely to fail, and locating it will be your first challenge. Try contacting a service rep with your motorhome’s manufacturer, if the company is still in business, or call an RV service center that actively works on the brand of RV you own. Ask whether someone can tell you where to locate the motor for the door in question. If the manufacturer rep or service technician can’t give you an answer, apply a little logic. Pocket door motors usually are located behind an adjacent cabinet or closet. Look for an inspection plate or a panel with screws, indicating it may be removable. The window motor usually can be found behind a removable panel located below the window.
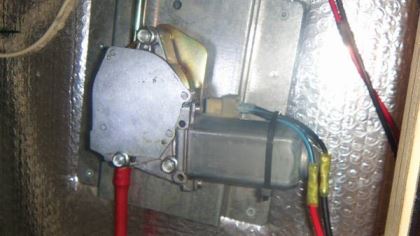
The vast majority of the motors are made by Bosch, but there are other manufacturers, including Dorman. After gaining access to the motor, label or mark the wire colors and then unplug the wires. Use a voltmeter or a test light while operating the In/Out or Up/Down switch to determine whether voltage is present at the motor terminals. If the answer is yes, then test the motor with an ohmmeter. You probably will not get any reading, which indicates that there’s an open circuit and the motor needs to be repaired or replaced. If there is no voltage at the motor, then look for those wire colors at the motorhome’s 12-volt-DC electrical panel, which usually is connected to a controller assembly. Once again, operate the In/Out or Up/Down switch to determine whether there is voltage output from the controller. If voltage is being output from the controller, then a wiring problem exists between the controller and motor and needs to be resolved. If there is no output, the next step is to see whether the trigger wire (usually a very small-gauge wire) is supplying voltage from the switch. Once again, operate the In/Out or Up/Down switch to test each of the trigger wires (two for each door) to see whether voltage is present at the controller. If the voltmeter measures current but the door does not operate, the controller is bad and needs to be replaced. If no voltage is measured, remove the switch and see whether it is functioning. One terminal on the switch should be marked “12V+.” Operating the switch should alternately activate two other terminals (In and Out). If the terminals do activate, there is a wiring problem to resolve between the switch and the controller. If they do not, replace the switch.
 Some RV technicians have a neat way to locate wiring problems. They use a signal injector to stimulate the wire and a signal detector to trace the wire. These devices can be found at some of the major home improvement stores.
If you find that you have to replace the motor, the first thing you need to do is to identify the part. The model number or part number is stamped on the side of the motor. Bosch has numerous variations of the same basic motor, probably to satisfy the requirements of various auto manufacturers. These variations can be detected in the last three digits of the number. A search on eBay for a particular part number may not be successful, as the car part number is usually more prominent. I was able to find a new (old stock) window regulator assembly for a 1980-1990 Audi RR door that had the exact motor number. I bought it for $60, discarded all but the motor drive, and attached it using the same three bolts. It works perfectly. Scores of Bosch and Dorman window motors are available for sale on eBay. Scroll through the items with similar numbers and look for a picture that matches the motor you removed, and then try to find a motor part number. Another good place to find automotive-style motors is NAPA.
If you can’t find a motor identical to the one you removed, don’t despair. You may be able to repair the original motor. First, mark the case and drive assembly so you don’t have an alignment issue when you reassemble the pieces. If you remove the motor assembly and separate the case from the gear drive assembly, you probably will find a defective brush assembly and/or an oxidized commutator. If the brushes appear to be okay but are just gummed up in their holders, some contact cleaner may solve that problem. The commutator can be resurfaced by clamping the armature in a soft-jaw vise and using 300-grit emery cloth in a shoe-shine fashion.
Bosch has sold two basic styles of window motors during the past 20 years. The motor housing attaches to the gear drive either with two screws or with four screws. For the vast majority of Bosch motor repairs, all you would need is the correct motor housing (two-screw or four-screw) with its brush assembly and the armature, as most of the variations are with the gear drive part. If you take the motor apart and find that all you need is the brush assembly for the two-screw Bosch motor, that item can be purchased on eBay for approximately $16.
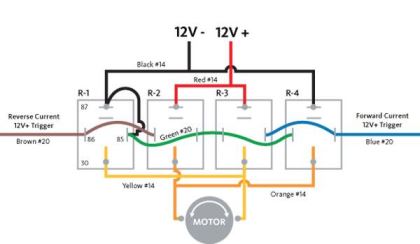
 If you determine that the controller assembly is faulty, finding a replacement controller assembly may not be possible. Begin by doing an Internet search using the company name listed on the controller to see whether that part is available. If you are fortunate enough to locate a replacement, this will save some time but not necessarily much money, as a controller can be fabricated for the price of a few relays, some connectors, and wire. See the schematic on page 44 for a single motor controller and build a second one for two motors. The cube relays can be found on eBay for approximately $2 each.
Replacing the switch may present another challenge, but plenty of switches can be found on eBay. The number of terminals is the key — either five or six. Select a size and style comparable to the switch you wish to replace. The illuminated switches are nice, but not a requirement.
After you have located and fixed the faulty part(s), a word of caution. These small 2-amp motors were not designed to move heavy pocket doors. Letting children play with the doors will generate excessive heat, which will contaminate the brushes and commutator. Also, be sure to release the switch when the door reaches its maximum travel in or out. Treat these small motors with respect, and they will last a long time.

