Upgrading your motorhome’s satellite dish.
By Mark Quasius, F333630
September 2013
Most new motorhomes sold today include a satellite TV dish either as standard equipment or as an option. Traveling RV owners can’t bring their cable TV or DSL service with them on the road, so motorhome owners who desire more programming than what’s offered by over-the-air broadcast stations have but one choice: satellite TV. Satellite TV dishes range from inexpensive manual units to sophisticated in-motion, dome-style antennas that allow passengers to watch TV while going down the road. A dome-style unit incorporates a small oval-shaped satellite dish mounted under a protective cover. The dish is motorized and will seek and lock in on the desired satellite, so it’s fairly user-friendly. Just turn it on and let it find the appropriate satellite.
Satellite domes do come with a number of caveats. The signal strength possible through any satellite system depends on how much of the signal can be gathered and directed to the receiver head, commonly known as a low noise block converter (LNB). The signal strength is proportional to the size of the dish, so larger dishes are able to gather more signal and overcome atmospheric interference to deliver a clean signal under varying conditions. The space inside a dome is limited, so the dish size needs to be somewhat small. On a fair day, this isn’t a problem, but when the clouds start rolling in prior to a storm or when rain fade kicks in, the signal is lost frequently. The dome itself also contributes to loss of signal. Morning dew, condensation, or frost on the dome refracts the signal, allowing only a portion of it through to the internal dish, resulting in further signal degradation.
Every dome unit currently on the market is limited to the Ku band of satellite transmissions. DIRECTV has placed its high-definition (HD) programming on the newer Ka-band satellites, which means that DIRECTV subscribers can receive only standard-definition programming on a dome-style unit.
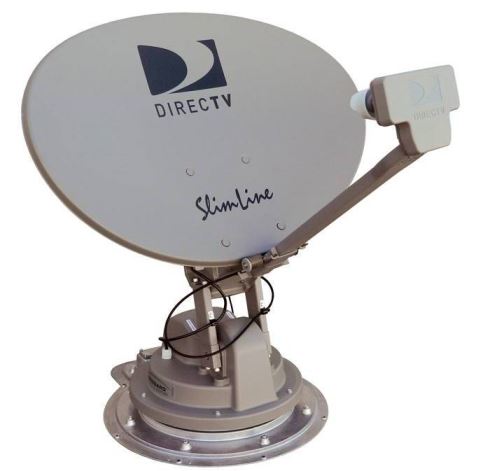
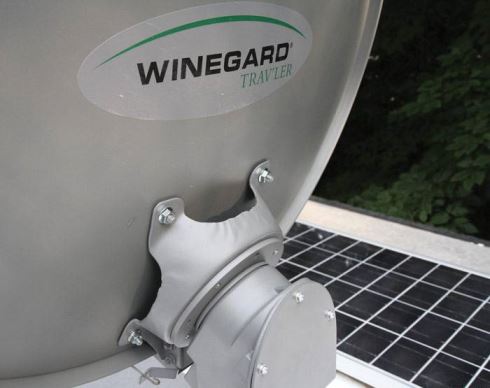
Because of these issues, many motorhome owners have upgraded to the Winegard TRAV’LER antenna. The TRAV’LER SK-3005 utilizes a larger, open-face dish (44 inches wide, 34 inches high), without the size constraints of a dome. This allows the reflector dish to be of sufficient size to obtain a stronger signal than is possible with a dome. The TRAV’LER is oval-shaped and has multiple LNBs, so it can receive Ku-band transmissions as well as DIRECTV’s Ka-band high-definition feeds. All antennas used are approved and certified DISH and DIRECTV reflectors that are also used for residential purposes. This system is fully automated, and all it requires is a push of the button to deploy it once parked.
Our motorhome was equipped with an in-motion dome as standard equipment, and we put up with the rain fade and dome issues for a number of years. Recently we upgraded our home system to include DIRECTV’s HD subscription service and new DVRs. I also established a connection from the home system to our motorhome, which allows us to watch high-definition satellite TV in the coach when parked in our tree-shaded driveway. After becoming hooked on the high-definition quality, we decided it was time to upgrade the motorhome’s dish to receive DIRECTV’s high-definition signal, while also eliminating the problem of rain fade caused by the dome antenna.
 The Basic System
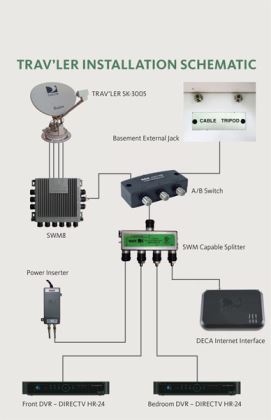
The first step was to decide what equipment to use. We chose Winegard’s TRAV’LER SK-3005. The SK-3005 has five LNBs so it can access any DIRECTV satellite. The TRAV’LER has four outputs that can be connected to four receivers or a pair of dual-channel DVRs. However, the dish mounted on our house has single-wire multiswitch (SWM, pronounced “swim”) technology. SWM can send up to eight separate channels on a single cable, which makes it much easier to run cable. With SWM, you need to run only a single coaxial cable to each dual-channel DVR. SWM technology is particularly useful in a motorhome, as running additional cable after the coach has been built can be a challenge.
Winegard makes a SWM8 device that takes the multiple feeds from a non-SWM dish and encodes it into SWM output. The SWM8 can be mounted on the roof of the motorhome or it can be located inside the coach. In my situation, it was easy to access the area behind the front cap by removing the front overhead TV, so I decided to install the SWM8 inside where I don’t have to worry about sealing the cable connections to protect them from moisture. Winegard recommends the rooftop option, because the SMW8 can become quite warm; so, if you elect to install it inside, make sure adequate ventilation exists.
In order to switch between the TRAV’LER and an external feed, I added an A/B switch to select which dish would feed signal to the DVRs. I can use it to switch from the TRAV’LER to my house dish, or to an external tripod dish should I choose to add one in the future.
Non-SWM systems cannot use splitters, because the receiver or DVR needs to send a tone to the LNB to supply power to the correct LNB and to switch between even and odd transponders. So, a multiswitch is required in order to enable communication and switching between the transponders. But SWM systems are designed to operate with splitters. However, a basic cable TV or RF splitter cannot be used. SWM-capable splitters are of a higher bandwidth and allow bidirectional communication. They usually have a green label that indicates high band. I chose to add a 1×4 splitter to the system in order to give me enough connections to the various devices.
I also added a DECA (DIRECTV Ethernet Coaxial Adapter), which is DIRECTV’s device to integrate an Internet feed to the entertainment system. A Cat5 cable connects the DECA to my air card router, and a coaxial cable is run to one of the splitter’s outputs. A small 12-volt-DC power plug supplies power to the DECA.
On a non-SWM system, the receiver or the DVR sends power to the LNB. SWM systems don’t do that, but the LNB does need power, so a power inserter is used. The power inserter plugs into any available 120-volt-AC outlet and sends DC power via a coaxial connector, which is fed into the splitter to power the SWM system. (A splitter may not be required for all installations, depending on the number of receivers used or the SWM ports used. For instance, a splitter is not needed in installations with one receiver or installation with two receivers hooked up to the SWM #1 and SWM #2 ports.)
The Installation
 |
 |
 |
 |
| 1 | 2 | 3 | 4 |
 |
 |
 |
|
| 5 | 6 | 7 | |
| (click images to enlarge and view descriptions) | |||
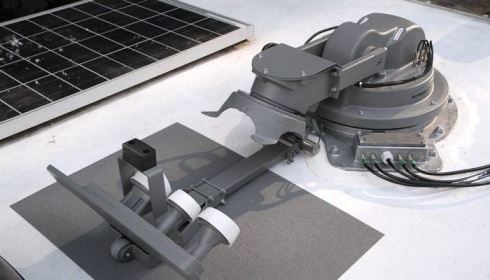
To begin, I needed to decide where to install the TRAV’LER on the motorhome’s roof. It does need a fair amount of space to avoid any mechanical interference with nearby objects or blockage of signal. That left me with two options. I could leave my dome in place and put the TRAV’LER on the rear deck of the roof, or I could remove the dome and put the TRAV’LER in its place. I had previously connected the SWM8 to my dome’s output cables and used the A/B switch to select between the standard-definition dome and the high-definition house feeds. But the hassle of changing the channel guide and setup on each DVR had become tiresome, so I decided to ditch the dome and mount the TRAV’LER in its place.
Removing the dome was easy, although carrying it down the ladder was a real treat. (Safety note: motorhome owners should exercise caution when working on the roof. In fact, it’s often best to leave this type of work to the professionals.) Once the dome was removed, I used epoxy to seal the original screw holes, and I cleaned up the roof.
The dome had been fed by a pair of coaxial cables, but they were in an unsuitable location for the TRAV’LER. Plus, they had been fastened to the interior of the roof, and it was impossible to extend them or use them as pull wires to fish new cables through. So I snipped off the ends and used fiberglass to seal the hole shut.
I mounted the new TRAV’LER on the front of the roof, paying careful attention to the installation instructions to ensure that I had adequate clearance from any nearby objects, such as the air horns, the front air conditioner, and the spotlight. I applied a good bead of self-leveling caulking beneath the rim and then screwed the base of the antenna into place, being sure to apply additional sealant over the screw heads once finished.
I chose a spot directly in front of the TRAV’LER, just behind the spotlight, to run my cables through the roof. With this location, the wires would drop right behind the front TV and would be accessible once the TV was removed. Before cutting the hole, I removed the front TV, cleaned up the existing cables, and removed the controller module from the original dome system. I drilled a 1 1/2-inch opening through the roof with a hole saw and fished the four coaxial cables plus the power and data cable through the hole to the area behind the front TV. I also added an optional auto-stow cable and ran the wire through to the same location. More on that later. Once the cables had been fished through the roof, I installed a cable cover plate over the hole, fastened it down with screws, and applied plenty of self-leveling sealant to prevent any water leaks. I also added some rubberized hold-down clamps to keep the cables neat and orderly.
Finally, I applied a sheet of 3M Safety-Walk slip-resistant material to the area where the dish will rest once it is stowed. This will provide an extra layer of protection against any roof damage caused by the antenna. On a previous motorhome, a rubber bumper fell off my batwing antenna and the unprotected part of the antenna wore a small hole in the roof that allowed water to penetrate. Therefore, I wanted an extra layer of safety just in case. It’s probably not necessary, but I tend to overdo things.
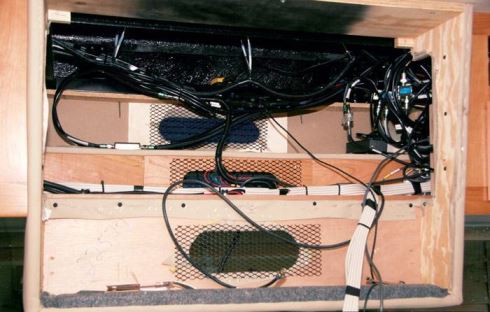
Once the roof portion of the installation was finished, I picked up my tools and moved inside. Plenty of room was available behind the front TV to mount the SWM8, the splitter, the power inserter, and the DECA. I previously had installed a small power block in that area to power the dome and TV, so I had plenty of AC outlets. I mounted the SWM8 on a wooden platform in that area and the power inserter close by and plugged it into the power block. In the same area, I mounted the DECA unit and plugged its power supply into the same power block. I ran a Cat5 cable to my Cradlepoint router, which was located in another cabinet. I then mounted the 1×4 splitter and began to make some coaxial cables.
SWM splitters have only one port capable of feeding power upstream, and it is generally port number 1. (On Winegard SWM systems, the power port on the splitter is labeled “DC power pass.”) The power inserter needed to be connected to a power port on the splitter, or it wouldn’t be able to send power to the dish. I connected the cable from my front DVR to port number 2 and the cable from the bedroom DVR to port number 3. Finally, I ran a fourth cable from the DECA to port number 4.
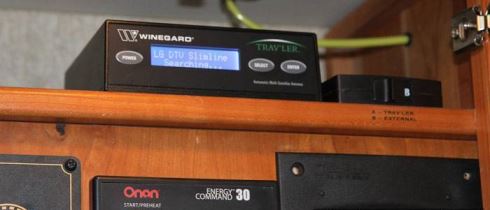
The next step was to place and connect the controller box. The easiest location in my motorhome was a small shelf above the panel that contained a number of other controls, such as the solar charge controller, automatic generator start, etc. I fastened the box down with 3M Dual Lock hook-and-loop fastening tape to ensure it wouldn’t move around. I then plugged in the data cable, which connected it to the dish. The cord that came with the controller needed to be about 3 inches longer to reach the nearest electrical outlet, so I made a short extension cord to allow it to extend to my power strip behind the front TV.
Technically, the system was complete. But I chose to add an optional auto-stow cable. The auto-stow cable plugs into the back of the controller module and connects to the ignition or the parking brake — your choice. When the parking brake is released, or the ignition key is switched on, the TRAV’LER automatically stows. That way, you cannot drive away with the dish extended and risk having it damaged by low-hanging trees. However, I didn’t want that exact feature, because there are times when I want to leave the antenna up and drive a few feet to position the coach to clear a tree branch or other obstruction that’s blocking the signal. Fortunately, the auto-stow cable also can be used to establish a warning-only signal that triggers an alarm. I chose to go that route, so I installed a warning lamp in my dash that matched the jacks-down warning light. I ran a wire from an ignition-hot power source to a turn signal flasher, then to the warning lamp, and then to the auto-stow harness, which would ground the circuit if the antenna were left up. The turn signal was an LED-style so that it could function with the minimal resistance of a small panel bulb. It also came with a sound transducer that beeps, so I have an audible warning as well as the flashing panel light. The alarm sounds only when the ignition key is on and the dish is up. This gives me adequate warning if I try to drive off with the dish not stowed.
The Results
I can say that this project was well worth the time and effort. I now watch great HD-quality TV and no longer have to switch channel guides or reset the system when switching between the external home feed and the TRAV’LER motorhome antenna. The TRAV’LER is a breeze to set up. Just push the power button and the system activates, scanning the sky for the appropriate satellite. It does this automatically — locks on to the correct satellite perfectly, and fine-tunes itself for maximum signal strength every time. We no longer have to deal with rain fade, morning dew, or frost. The larger reflector gives us a much stronger signal than with the smaller dome, and we get reception through most clouds, rarely ever losing the signal. The only thing we gave up was the ability to watch or record shows while in motion, but that’s a small price to pay for what we gained.
Further Info
Winegard Company
3000 Kirkwood St.
Burlington, IA 52601-2000
(800) 788-4417
www.winegard.com
Editor’s Note: In the time since Mark Quasius installed the TRAV’LER SK-3005 satellite RV dish in his motorhome and wrote about the process, Winegard has come out with an updated version of the TRAV’LER, the SK-SWM3. The antenna is identical and works nearly the same as the SK-3005. The difference is that the SK-SWM3 comes with SWM hardware built in, along with the power inserter and a 1×4 splitter, so no additional hardware is required to make it SWM ready.

