
Consolidate your spice collection into one central, space-saving location.
By Lee Christenson, F410745
November 2010
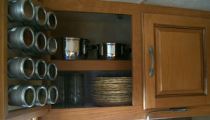
Although most motorhome galleys are completely functional, finding space to store the pots, pans, bowls, utensils, and other cooking necessities you’d like to carry can be problematic. This do-it-yourself project will help you organize your spices into one neat, easily accessible location on the inside of a cabinet door, giving you additional storage space for other items.
Tools and accessories needed for this project:
-
Spice tins (magnetic)
-
Label maker
-
Measuring tape and marker
-
Aviation shears (tin snips)
-
Sheet metal (not aluminum)
-
Narrow-rail picture frame
-
Adhesive-backed, hook-and-loop fastening material tape
Step One:
The first thing you will need to determine is whether you have a cupboard with recessed shelves that will provide the clearance space for the cabinet door to close once the spice rack (with tins attached) is installed. Purchase the spice tins online or find them at kitchen or crafts stores. I used 4-ounce, clear top, 2 ¼-inch-diameter, magnetic-type decanters, but other sizes are available. Most hardware outlets stock the sheet metal needed for this project. (A standard size is a 12-inch-by-16-inch sheet.) Purchase a 10-inch-by-14-inch picture frame at a mass merchandise retailer.
Step Two:
Measure, mark, and cut the sheet metal to the size of your picture frame. Place the sheet metal into the frame facing the front, and clasp the picture glass behind it for added stability.
Step Three:
Stick one side of the hook-and-loop fastening material around the back rail of the picture frame. Then apply the opposite side of the hook-and-loop material directly to the inside of the cupboard door, using the same dimensions as the picture frame.
Step Four:
With the fastening material pieces in place, firmly press the picture frame onto the cupboard door. Fill each decanter with your favorite spices, label them accordingly, and attach the tins to the sheet metal.