
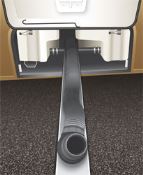
Hose Storage
Waste tank management is one of the least pleasant chores related to motorhome travel. On my 2008 Winnebago Outlook Type C motorhome, I especially found stowing the sanitation hose to be a problem. I noticed that there was a space between my gray and black holding tanks where I could store the hose. The only problem is that I would have to nearly climb into the compartment (yuck!) to get the hose onto the shelf between the tanks. So I purchased a piece of vinyl rain gutter, cut it to the length of the hose, and capped the back end. The gutter fit perfectly between the tanks and provided a perfect channel for the hose to rest on. The rain gutter hose tray slides in and out of the space easily, and I can pick up the hose at both ends whether I’m pulling it out or putting it away. The total cost was approximately $8. An end cap for the front of the gutter is optional.
Rory Tuggle, F407193
Las Vegas, Nevada
Cupboard Slide-Out Shelves
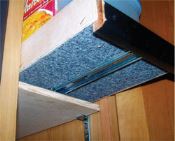 The cupboard in our motorhome is narrow and deep (7 1/2 inches by 22 inches), which makes it difficult to find and retrieve items from the back. My wife wanted sliding shelves, so I made the following modifications. The existing shelves were trimmed in width, and 2-inch-high sides and a back were added using 1/8-inch plywood. Trim the width so that with the addition of the 1/8-inch plywood, the shelves will be able to slide through the cupboard opening. An additional piece of 1/2-inch plywood (long and wide enough to fit the existing location) is also required for each shelf to become a base for the sliding shelf. A single sliding center-under-mount mechanism, available from home improvement stores, is also needed for each shelf you wish to modify. Following the slide mechanism instructions, attach the parts to the new 1/2-inch plywood shelf base and the existing shelf. The 1/2-inch plywood shelf base will need to be secured to the back of the cupboard with an L bracket so it doesn’t move when the sliding shelf is pulled. You can position the shelves wherever you need them before securing them with the L bracket. Now each shelf can be pulled forward, and you can find and retrieve what you need without unloading half the shelf.
Richard Fry, F285034
Williamson, New York
{loadpositionEndBlurbTips}