Ensure that your 120-volt-AC electrical system is operating at peak efficiency by performing these annual preventive maintenance tasks.
By Brett Wolfe, F252125
February 2013
If you expect your motorhome’s 120-volt-AC electrical system to provide reliable service each time you plug in at your campsite, it’s important that you give it a yearly checkup and perform some preventive maintenance. Follow the steps below to help reduce the chances that you will be left in the dark during your next outing.
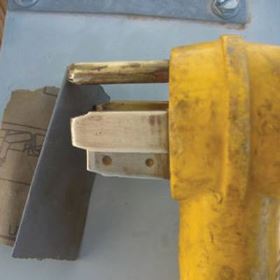
Start with your shore power cord and adapters. Make sure all the contacts are clean and shiny. If they are not, use 200-grit sandpaper to clean the prongs, or coat them with DeoxIT Contact Cleaner and Rejuvenator, which will transfer the cleaner to the female parts of the adapter that can’t be reached with sandpaper. Ensure that the rubber around the prongs is not melted or cracked, and that the prongs are not badly arced or pitted from connecting/disconnecting under heavy load. If you find this kind of damage, replace the adapter. If the damage is to your shore power cord, replace it or install a new cord end.
![]() Most RV manufacturers use breaker boxes with standard screw-type connections — the same type of connections are used in most automatic transfer switches. One of the most frequent causes of failure and fire is that the screws securing the wires will loosen from the vibration of traveling down the road or the warming (expansion) and cooling (contraction) of the compression area. Loose connections will cause resistance and heat, which will accelerate the melting of insulation and oxidation of the wire, leading to additional resistance. This can continue until you lose power; damage the breaker box or automatic transfer switch; or, if the neutral connection fails, until major damage to your coach’s electrical system occurs. So, make sure to put a little more torque on these screws when you tighten them.
Most RV manufacturers use breaker boxes with standard screw-type connections — the same type of connections are used in most automatic transfer switches. One of the most frequent causes of failure and fire is that the screws securing the wires will loosen from the vibration of traveling down the road or the warming (expansion) and cooling (contraction) of the compression area. Loose connections will cause resistance and heat, which will accelerate the melting of insulation and oxidation of the wire, leading to additional resistance. This can continue until you lose power; damage the breaker box or automatic transfer switch; or, if the neutral connection fails, until major damage to your coach’s electrical system occurs. So, make sure to put a little more torque on these screws when you tighten them.
The next part should be undertaken only by someone familiar with 120-volt-AC electric and is confident working with it. Turn off the shore power breaker and unplug the cord from shore power. Verify that the generator is off and the auto-start function is disabled. Turn off your inverter (if equipped). Verify with a voltmeter or test lamp that all power is off. If this is beyond your technical skill level, no problem — just make sure your RV service tech does this once a year.
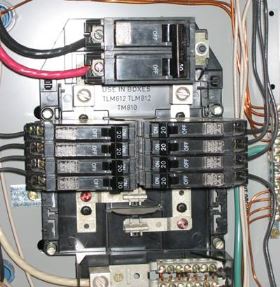
![]() With all 120-volt-AC power confirmed OFF, remove the cover to your breaker box. Verify that all wire insulation is intact and that the wire strands are clean and shiny. Clean all wires (I use DeoxIT). If you find damaged wires, replace them. If there is enough extra wire, remove the damaged portion and strip a new portion of the wire for the connection. Tighten all set screws — hot, neutral, and ground. Verifying that the wires in the breaker box are in good condition is a wise investment of a few minutes.
With all 120-volt-AC power confirmed OFF, remove the cover to your breaker box. Verify that all wire insulation is intact and that the wire strands are clean and shiny. Clean all wires (I use DeoxIT). If you find damaged wires, replace them. If there is enough extra wire, remove the damaged portion and strip a new portion of the wire for the connection. Tighten all set screws — hot, neutral, and ground. Verifying that the wires in the breaker box are in good condition is a wise investment of a few minutes.
Do the same with the automatic transfer switch. Again, ensure that the insulation for all wires is in good condition, the copper is clean, and the screws are all tight. Many automatic transfer switches have had to be replaced because of damage from loose connections that lead to heat and cause the device to fail.
 Know Your Service
There is a misconception among some motorhome owners that 50-amp service provides just 20 additional amps of electric over 30-amp service. It’s not hard to see why. Subtract 30 amps from 50 amps and it’s reasonable that you’d come up with 20 amps. But with motorhome electric, that’s not how it works. Yes, 30-amp service allows you to use up to 30 amps of 120-volt-AC electric. But 50-amp service will provide up to 100 amps of 120-volt-AC electric, because there are actually two 50-amp lines that come into the motorhome. So, when compared to 30-amp service, 50-amp service provides an additional 70 amps of AC electric to run all of your motorhome’s electric-powered accessories.

