Change your diesel motorhome oil, fuel filter, and air filter, and perform other regular tasks to save money while maintaining your investment.
By Mark Quasius, F333630
February 2015
An old Fram oil filter commercial put it this way: “You can pay me now, or pay me later.” That most certainly applies to motorhomes, including diesel pushers, which are the focus of this article. Motorhomes are a sizable investment, and the chassis requires preventive maintenance, lest you face some fairly hefty repair bills down the road. Maintenance on a motorhome chassis isn’t all that different from that required for a pickup truck or passenger vehicle, except in the case of a motorhome, everything is bigger and heavier.
Most costs associated with maintaining a motorhome are related to labor, rather than parts and filters, so making this a do-it-yourself project will save you quite a bit of money. But servicing the chassis involves more than just running through a checklist, changing some fluids, and replacing filters. It is the perfect time to inspect the chassis closely to see what may be falling off, binding, or rubbing. No one cares more about your motorhome than you do, so you may even pay closer attention than the typical service tech. You’ll also gain a certain satisfaction in performing this work yourself.
Gather Information
To get started, you’ll need all the service information that pertains to your motorhome. Most owners manuals include the basics regarding capacities, oil grades, and time and mileage intervals for the various service tasks. Additional details can be obtained by searching the Web for service tips, filter part numbers, etc. You also can obtain information from other motorhome owners by visiting the FMCA Forums at FMCA.com.
Because motorhomes are bigger than your “daily driver,” you’ll need some specialized tools. However, the money you save by not hiring someone else will pay for those tools in short order. You’ll also have to find a place to dispose of old fluids, such as a local recycling facility. And, you’ll need a work space. Motorhomes won’t fit into the average garage, so you’ll probably need to make do in your driveway on a nice day. And if you plan to service your motorhome in a campground, be sure to check with the management first.
Engine Oil
Before changing the oil, run the engine until it reaches operating temperature so that the used oil will drain thoroughly and quickly. Contaminants are more likely to be in suspension and will drain out as well. Verify your engine’s specs to see how much oil is required. Motorhome diesel engines contain a fair amount of oil, so chances are good that your drain pan won’t hold it all. Adding a Fumoto oil drain valve to the engine will help. This quarter-turn valve replaces the drain plug and allows you to stop the oil flow midway through the process so that you can change drain pans or buckets without making a mess. My Cummins 400 ISL engine holds 28 quarts of oil, so I use two 5-gallon buckets with screw-on gasketed lids to safely transport old oil to a recycling facility.
After the oil has drained, it’s time to replace the oil filter. A diesel engine’s oil filter is large in diameter, so you’ll need a big filter wrench to remove it. Most manufacturers recommend prefilling the filter so you’ll have oil pressure immediately upon startup. Wipe a little oil onto the filter gasket to prevent it from binding when you tighten the filter. Finally, add the correct amount of oil to your engine according to factory specifications. Run the engine for a while to check for any leaks, especially at the filter, before shutting it down. Allow the oil to settle into the pan for a few minutes before checking the oil level via the dipstick.
If you have added the correct amount of oil, but your dipstick isn’t accurate, you may need to adjust the dipstick. On some engines, this is done by loosening the dipstick tube hold-down clamp and sliding the assembly until the dipstick reads full, then retightening the clamp. After this adjustment, the dipstick will remain accurate.
Fuel System
Diesel engines depend on exact metering and timing of fuel and the heat of high compression to ignite the fuel mixture. The fuel systems required to do this are more complex than those in any gasoline engine. Small specks of dirt can plug injector nozzles or damage fuel-injection pumps, so fuel filtration is critical.
A typical diesel fuel system has two filtration stages. The primary fuel filter most likely has a water-in-fuel sensor unit that triggers a warning on the instrument panel when it detects water. If that happens, a petcock at the filter’s base makes it possible to drain the water. The filter is designed to trap rust and other heavy particles. A secondary fuel filter with a finer micron rating is located downstream and offers the final protection against minute particles entering the system.
Diesel fuel systems require a continuous fuel supply, so if the system runs dry, it will become air locked, and air must be bled out. The same holds true when changing fuel filters. There are two options. One is to prefill the fuel filters with fresh diesel fuel before installing them. If you do this, make sure to use clean containers, because any dirt that enters the filter can be harmful if it gets into the injection pump.
The second option is to prime the system to bleed out the air. Some engines require operation of a manual primer pump, while others, such as Cummins engines, allow activation of the electric fuel lift pump by turning the key on and off for 30-second intervals a number of times to purge air from the system. Some owners prefer to prefill the primary filter only, because the secondary filter will trap any particles that enter the system; they then use the primer pump to bleed air from the secondary system. My preference is to prefill both filters using a 2-gallon plastic fuel can that is dedicated to this purpose and always contains clean fuel. I do one filter at a time and run the engine in between to minimize the size of any air pockets that may need to be bled.
 Air Filter
According to diesel engine manufacturer Cummins, it takes only one tablespoon of dirt to ruin an engine. Air filtration, therefore, is important to a motor’s longevity. Air filters eventually wear out from age or become saturated with dirt, which restricts airflow. If the engine control module (ECM) determines there’s not enough air entering the engine, fuel flow will be reduced to provide the proper air-to-fuel ratio. That cuts the power output, so when the filter is dirty enough, it must be replaced.
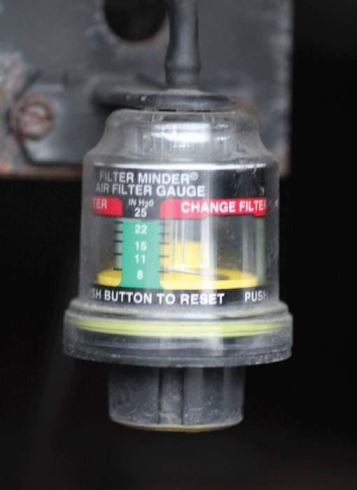
Air-intake systems generally are equipped with a filter restriction indicator that measures the amount of vacuum created when air is pulled through the filter. Most filters are designed to be replaced when 15 inches of vacuum above the baseline of the filter are present. So, for instance, if a fresh filter has 6 inches of vacuum, it should be replaced when the indicator reaches 21 inches of vacuum. When replacing the filter for the first time, run the engine at high rpm and then check the indicator to get a baseline reading. Make a note of it so you know the limit for your particular coach.
A filter’s age also is a factor. Paper elements don’t last forever, and if they get damp or old, particles can pass through and damage the engine. Most filters should be replaced every three years, regardless of how clogged they are, just to ensure that the filter material won’t fail.
![]() Also, check the air intake hoses for cracks or loose clamps. The air lines to and from the charge air cooler are under pressure; if leakage occurs, a loss of boost pressure will affect engine performance.
Also, check the air intake hoses for cracks or loose clamps. The air lines to and from the charge air cooler are under pressure; if leakage occurs, a loss of boost pressure will affect engine performance.
Cooling System
The cooling system prevents the engine from overheating and melting into a pile of scrap metal. Therefore, both the coolant flow and airflow through the system must be kept in optimum shape. Dirt can plug up a radiator, reducing airflow through the unit and limiting its ability to remove heat from the coolant. Rear radiators in motorhomes are especially prone to clogging. Oil fumes coat the cooling fins, and when air is pushed through the radiator to the outside, dirt sticks to this film and plugs up the fins. Such gunk has to be removed to restore proper cooling.
The coolant itself also should be replaced according to its specified schedule. If you have a heavy-duty coolant precharged with supplemental coolant additives (SCA), you’ll need to use test strips to verify the SCA and nitrite levels in order to prevent cylinder liner pitting. If you are using the newer organic acid technology (OAT) coolant, you won’t have to worry about that, but Cummins recommends that an extender be added at three years and that the coolant itself be replaced at six years.
Finally, belts and hoses should be checked. Rubber doesn’t last forever, and the heat of an engine compartment does them no favors. Belts may need to be adjusted, but it’s especially important to look at the inside of the belt to check for cracking. Hoses become hard and cracked over time, so inspect them and consider replacing them after five years.
 Transmission
Transmission fluid lubricates the transmission, transfers power through the torque converter, and cools the transmission. Transmission fluid and filters have a definite service life, so be sure to refer to your service schedule to determine when these items should be changed. Allison transmissions are commonly found in motorhomes, and the company provides two fluid/filter schedules. One is for standard Dexron automatic transmission fluid, while the other is for synthetic automatic transmission fluid meeting Allison’s TES 295 specifications, such as Allison’s TranSynd fluid. Fluids and filters meeting TES 295 qualify for extended service intervals, so there are significant benefits to using TranSynd. When changing transmission fluid, be sure to wipe any deposits from the magnetic drain plug before reinstalling it.
Brakes
Air drum brakes generally are equipped with self-adjusting slack adjusters that maintain the correct setting on brake shoes. However, if they fail to self-adjust, you may need to adjust them manually. Do this by chocking the wheels and releasing the brakes. Adjust each slack adjuster so there is one inch of free play when you pull on it.
If your motorhome has hydraulic brakes, the procedures aren’t much different from those associated with any other vehicle, except everything is bigger. Motorhome brakes are prone to fade after heavy use, because of the coach’s weight. Brake fluid is hygroscopic, which means it absorbs water. When the brakes become hot, that water can turn to steam and create a spongy brake pedal with no braking action. Motorhome brake fluid should be bled and changed every three years to ensure that the fluid is water-free.
Disc brake calipers tend to freeze up over time, especially when an RV isn’t driven that often. Sticky calipers can drag, cause damage to brake rotors, and affect the stopping ability. Inspect the calipers and use special caliper lubricant on the slides of sliding caliper brakes to ensure they don’t bind.
On drum air-brake systems, S-cams, which engage the brake shoes, should be cleaned and lubricated periodically. If not serviced, S-cams might stick, causing the drums to overheat. Signals that it’s time for service include hearing a “thump” sound while applying the brakes or when setting the parking brake, and a noticeable increase in braking distance.
Air System
Any motorhome with air brakes or air-ride suspension will be equipped with an air-supply system. It consists of an engine-driven air compressor, various air tanks, an air dryer, and numerous valves and hoses. The brake diaphragms are rubber, and the various valves also have rubber seals in them, so it’s important to provide clean air that has no oil in it. Moisture can freeze up brake lines and components in winter, rendering the brakes inoperable, so the air also must be dry. An air compressor tends to add a bit of oil to the air during normal operation; any moisture in the incoming air also will pass through the system. When mixed with the oil fumes, this forms a slimy mess that can damage the rubber products in your air system.
To combat this, an air dryer is installed directly after the air compressor. The dryer removes moisture and oil from the air and ejects it from the dryer’s drain port. A coalescing, or desiccant, filter element removes any oil or moisture that has made it that far and passes the dry air to the air tanks, where it is made available to the brakes and suspension components. The filter on the air dryer is designed to last for three years, but that is just an estimate; the time will vary depending on how much air and moisture pass through it. Expect to replace the air dryer sooner in a warm, humid area than in a dry climate.
Once the air dryer’s coalescing filter element loses its effectiveness, moisture passes into the air tanks. That’s why it’s important to drain those tanks regularly. Normally, you’ll pull the drain lanyards and hear the air blast out, but you won’t see anything, because the air is clean. However, one day you’ll observe moisture spitting out, which indicates it’s time to service the air dryer. It’s not difficult. Drain the tanks, and then use a large strap wrench to unscrew the filter. Regularly draining the air tanks might feel like a useless task, so think of it as testing the tanks for moisture, which is an important job.
 Suspension And Driveline
A motorhome’s front-end suspension and driveshaft have a number of grease fittings that regularly require fresh grease. These fittings can be hard to find, so be sure to check the owners manual for their exact location. Purchase a quality grease, preferably with a moly additive. Use a grease gun to pump it into the fitting until you see the old grease exit, and then wipe off any excess. This will ensure that any water or contaminants have been flushed out of the cavity.
Solid front axles have kingpins where the steering knuckles are attached. To effectively grease the kingpin bushings, jack up the axle to remove weight from the wheel. This allows the kingpin to float so that grease can thoroughly penetrate around the bushings and the thrust washer. If the grease job is done with weight on the tires, the bushings will wear out prematurely. Driveshaft universal joints on larger coaches may have two zerks (grease fittings) per joint, so be sure to grease both to keep the universal joints lubricated.
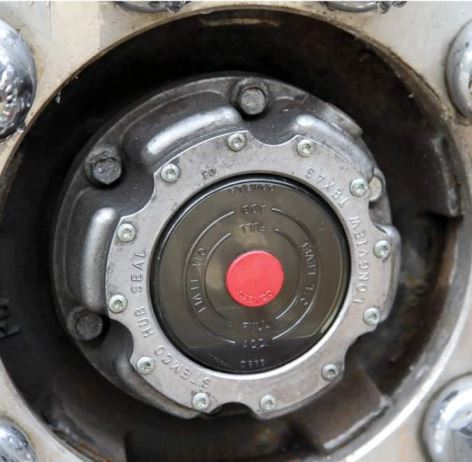
Many diesel pushers have oil bath wheel bearings on the front axle as well as the tag axle, if so equipped. The gear lube flows easier than grease and does a better job of lubricating these bearings. Inspection of the gear lube level is done via a Stemco hub cover, which has a clear plastic lens with molded rings that mark the “full” and “add” levels. A rubber plug in the center can be removed to facilitate adding more gear lube. This level should remain constant.
![]() If the level drops, you most likely have a leak someplace. Check the rear of the tire and wheel rim. If the wheel seal has been leaking, you should see evidence of splatter; in that case, the seal should be replaced and the bearings should be inspected. If it is time to change your gear lube, you’ll need to get the old lube out of the wheel hub cavity. Simply removing the drain plug and rotating the wheel to the bottom won’t get all of the old lube out of the hub. It’s best to remove the hub cap and suck the old gear lube out of the cavity, and then replace the gasket and reinstall the hub cover.
If the level drops, you most likely have a leak someplace. Check the rear of the tire and wheel rim. If the wheel seal has been leaking, you should see evidence of splatter; in that case, the seal should be replaced and the bearings should be inspected. If it is time to change your gear lube, you’ll need to get the old lube out of the wheel hub cavity. Simply removing the drain plug and rotating the wheel to the bottom won’t get all of the old lube out of the hub. It’s best to remove the hub cap and suck the old gear lube out of the cavity, and then replace the gasket and reinstall the hub cover.
Tires
On road trips, a quick visual inspection of the tires and a tire pressure check should be done daily. When servicing your RV, check for tread depth and carefully inspect the tires for any sidewall cracking or anomalies in the tread, such as rivering or scalloping. If those problems are evident, it’s probably time to have your RV’s alignment checked. Harmful ultraviolet rays from the sun will damage tires over time, but you can extend their life with tire covers.
Taking time to properly maintain your motorhome will result in some substantial long-term savings and will keep you on the road, enjoying your pride and joy.

