
House Calls: November 2017
Dear RV Doctor:
The chassis batteries are going dead on my 2000 National RV Tradewinds motorhome. I looked for a short, and I noticed that the battery switch on the dash, if pushed, connects the chassis and coach batteries. But both wires are hot, which indicates to me that the solenoid switch is stuck in the closed position. I looked everywhere but cannot locate the solenoid. Am I correct in my assumption?
Gunter Liebel, F134287
Conroe, Texas
I wish I could remember the exact location of the emergency start solenoid on your coach. Check down near the battery bank or perhaps on the firewall. It may be hidden from immediate view, perhaps mounted in a plastic box with a cover on it.
The fact that you have battery power on both sides of the dash switch does not immediately bring the solenoid into question. It depends on the type of switch National RV used back in those days. I’m assuming it was a typical push-button or rocker-type momentary switch, one that does not lock into the “on” position but provides a momentary, yet immediate parallel connection between the coach battery bank and the house battery bank.
In most applications, the dash switch simply sends positive 12 volts DC to the solenoid. Once the solenoid closes, both banks are put into a parallel configuration, thereby providing a boost from the house bank to help start the engine. Personally, I was never a fan of the solenoid method of battery separation, because the two battery banks contain different types of batteries meant for different purposes.
You can easily verify whether the dash switch is faulty by disconnecting the wires and using the ohmmeter function of a digital multimeter. Determine whether you have continuity through the switch when it’s activated, and then see if the continuity is still there when it’s released. You should see continuity only when the switch is closed. And once you find the solenoid, it too can be bench-tested using continuity and a voltage source to energize the coil portion.
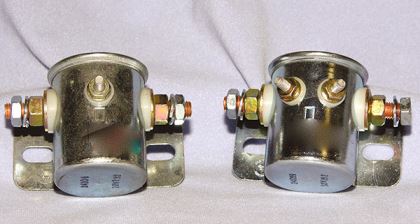
You may find either a three-terminal or a four-terminal solenoid. In both cases, the large lugs on each side are for the battery positive cables; one from each battery bank. The single, small terminal is for the signal wire sent by the dash switch. If there are two small terminals on the solenoid, one is for the hot wire from the dash switch, and the other is grounded to the chassis frame or the negative side of the battery bank. There is no polarity between the two smaller terminals. One is hot; the other is ground.
Connect an ohmmeter to the two large lugs. Add positive 12-volt-DC power to one of the two smaller terminals, and negative to the other. If there is only one small terminal on the solenoid, ground the case or one of the mounting brackets and apply positive voltage to the small, single terminal. You should hear a definite click and have immediate continuity between the two large lugs. When you remove the voltage, the coil portion of the solenoid should disconnect the continuity between the two large terminals. That indicates a proper solenoid cycle of closing and opening.
If you have continuity between the two large terminals all the time, or no continuity when you apply 12-volt-DC power, then the solenoid is indeed faulty. Another indication of a faulty solenoid is continuity between either of the two large lugs and the case or bracket of the solenoid. The hard part is actually locating the solenoid.
If the solenoid is faulty, it is important to replace it with a continuous-duty solenoid. Though a dual-battery solenoid looks like a typical automotive-style switch, it’s not the same thing. High current passing through a common automotive relay will result in overheating and component failure happening fairly quickly. Continuous duty is a must. The other alternative is to modify the dual-battery setup by switching to a true battery isolator or a “smart” solenoid.
Dear RV Doctor:
How can we avoid bad diesel fuel? We have a 2014 Itasca Navion motorhome with a 3-liter V-6 diesel engine on a Mercedes-Benz Sprinter 3500 chassis. We store our Navion IQ over the winter and start it regularly. We put Sta-Bil diesel fuel stabilizer in the tank over the winter and add it to every tankful.
We drove the coach 5,000 wonderful miles this season with no problem, until we bought diesel from a major-brand gas station. (We always use only the best grade of diesel.) The engine light came on 100 miles down the road, so we pulled off in the middle of nowhere. The Sprinter manual indicated that we could drive the vehicle, but it would not go faster than about 20 mph. A call to Mercedes-Benz resulted in the Navion being towed to a dealer. The dealer service department found that the fuel system was plugged up with algae. They blew out all lines, changed the filter, drained and cleaned the fuel tank, and replaced the low-pressure pump. They recommended that we travel with spare fuel filters.
How common is this with diesels? How can we avoid it? Maybe we are not candidates for driving a diesel RV. Should we switch to a gas-powered rig?
Charles Stewart
Via Email
Since your question is a little outside my comfort zone, I forwarded it to our resident diesel expert, Brett Wolfe, who also administers FMCA’s online Forums (community.fmca.com), a great resource for coach owners that I regularly use as a reference tool myself. Brett is quite insightful; his response follows:
“Having algae in diesel is pretty rare. We have had that happen once in a little over a quarter million miles. But, indeed it can happen. I agree that any diesel vehicle should have two spare fuel filters (or two sets of filters if it’s a two-filter system). Mark the dates on them so you use the oldest one first to keep them fresh. As far as a defense, here are two suggestions:
Keep a biocide on hand. Biobor JF (www.biobor.com) is a common one found at marine stores. One 16-ounce bottle will last the life of the coach. I do not add it until there is a problem, or when storing the coach for more than two months in summer or more than three months in winter.
I keep a clear glass jelly jar with a lid in a compartment next to my diesel fill. When refueling, I start the pump and put 10 ounces or so into the glass container. If contaminants such as water or dirt are present, it’s very likely they will be visible in the glass jar. After you verify that the diesel fuel is clear, pour the 10 ounces in the fill neck and start filling the tank. Unless you can prove where you got the contaminated fuel (a pretty tough one), there is rarely recourse. But it’s certainly worth checking with your insurance company just to be sure.”
Dear RV Doctor:
We need to remove the Diamond Shield paint protection film from our 2009 Tiffin Phaeton motorhome. We’ve watched many videos online, but nothing works yet. What’s your best recommendation? Heat? Solvent? Labor? All of the above?
Gary Baird, F432956
Friendship, Maine
The short answer is yes! Typically a heat gun, a plastic scraper, and a whole lot of patience are needed. Though I hate to send you back online, here’s another video to watch: https://goo.gl/bJIczX. It shows Diamond Shield being removed using Release, an adhesive and sealant remover from RV by Life (www.rvbylife.com), an FMCA commercial member. I have not tested this product, but I have spoken with the company owner on many occasions. Apparently the product works pretty well. But the degree of difficulty will always vary among different motorhomes depending on how old and in what shape the Diamond Shield film is in, the specific expertise of the person manipulating the heat gun and scraper, and even the types of climate the coach has been subjected to over the years. It worked in the video; I hope it will work for you.