
Waterless P-Trap
Dear RV Doctor:
Recently I was at an RV show, and I noticed that under the lavatory sink there was not a regular P-trap, just a straight fitting or adapter. Any idea what this was? I thought all sinks had to have a water lock to keep the holding tank fumes from getting inside the motorhome.
Craig Jones, Bellingham, Washington
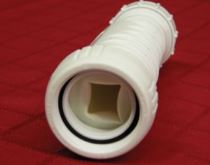
Actually, what you saw was a new type of waterless P-trap, which might be better described as a waterless sanitary waste valve. Called the HepVo and developed by Hepworth, this waterless valve eliminates the need for a bulky P-trap hanging below RV sinks or installed below a shower/tub enclosure. For RV makers, this maximizes the ceiling height in the shower; no need to have that bubble skylight in the roof anymore, since the pan can be installed directly on the floor with the drain plumbing below. In the aftermarket, the HepVo valve will provide motorhome owners more under-counter storage space. In addition, because there isn’t any water sitting in the pipe, it does not require RV antifreeze during winter prepping.
The HepVo’s unique design incorporates a flexible, self-sealing, internal silicone membrane that opens when water is flowing and completely closes when the flow stops to prevent holding tank odors from coming up and through the fixtures. Because it is an effective air-suppression device, this new valve even eliminates the need for additional anti-siphon trap vent devices (ASTVD) at fixture trap arms, another cost-saving manufacturing advantage that should eventually filter its way to the RV buyer. It can be installed either horizontally or vertically, thereby maximizing builder options. This new design also has proven to have hygienic benefits, since waterborne food particles and debris cannot become trapped inside and given a chance to develop microbiological and bacterial growth.
The HepVo cannot be rendered ineffective by freezing temperatures, siphoning, evaporation, water compression, foaming, capillary action, or by any disproportionate physical movement of the motorhome “” all possible outcomes common with a standard water-lock P-trap. All in all, it is a neat, space-saving method of preventing holding tank odors from entering the RV, even during periods of nonuse. Already being installed by many coach manufacturers, it’s likely the HepVo waterless valve will be gaining new enthusiasts in the aftermarket during the coming months.
Orphaned Wiring Diagram Needed
Dear RV Doctor:
I purchased a 1987 Monaco LE motorhome and had it shipped to Australia. I am seeking a wiring diagram for the coach. It is a gas pusher with a 454-cid engine. Could you help or advise who could?
Gary Cubbage, Greenland, New South Wales, Australia
Unfortunately, I no longer keep wiring diagrams on file. I did for many years, but it became too cumbersome to store all that paper. I do have a couple of suggestions, though. First, you could try contacting Monaco RV (800-634-0855) to see whether they could provide you with such a diagram. You also might check with Monaco dealerships that were selling back in 1987 to see whether they have any diagrams on file. You can search for Monaco dealers by visiting www.monacocoach.com/dealerfinder.html.
There are many RV chapters and clubs that are brand-specific. Check Family Motor Coach Association’s Web site (FMCA.com) and the January and August issues of FMC magazine for listings of chapters, including those for Monaco owners. RV clubs are a great source of technical information, as they are typically a dedicated bunch. In fact, I’m wagering that if you can’t find a wiring diagram through Monaco or one of its dealers, a fellow coach owner will have what you’re looking for.
Drippy Faucets
Dear RV Doctor:
How do you repair a bathroom faucet? I have a two-handle faucet in the bathroom that looks to be all metal, and it constantly drips. How and what do I replace?
Mike Ringers, Richmond, British Columbia, Canada
The most common cause of dripping faucets is debris or mineral deposits becoming stuck in the assembly, so let’s not be too quick to condemn an innocent faucet, at least until proven faulty!
In some cases, however, older faucets can suffer from worn rubber washers or a fouled cartridge. I’m assuming you’ve already tried to flush any contaminants by fully opening each faucet and letting it run for a few moments. This is best effectuated when connected to a city water source. (Temporarily remove the pressure regulator, if so equipped.) If a thorough flushing doesn’t remove the debris and the faucet still drips, it will be necessary to disassemble the faucet and check the seat washers.
First, turn off all water sources and relieve the pressure at the faucet. Remove the hot and cold handles. Usually the handles are held in place by a single screw located underneath a removable button on top of each handle. Once the handles are off, carefully remove the bonnet lock and washer. Some will just lift off, but others may need to be popped off by gently using a flat-blade screwdriver. Remove each stem and bonnet assembly using an adjustable wrench or a deep-well socket (turn counterclockwise). I believe this requires a 3/4-inch socket. Carefully inspect each assembly as well as inside the body of the faucet for loose debris and/or mineral buildup. Brush or scrape away any residue you find and rinse all the parts in clean water. Carefully inspect the bottom seat washer and replace it if it’s dried out, cracked, pinched, or distorted in any way. A single screw holds this washer in place. For a quick test “” or even a temporary fix “” flip the seat washer over, reassemble the faucet, turn the water back on, and check for drips. If the dripping goes away, you’ll know it’s the washer that needs to be replaced.
If the faucet continues to drip, you’ll have to dig further and inspect the seats inside the body of the faucet. Some faucets have removable seats while others do not. Seats with a hexagonal opening can be removed and replaced. Check the top surface of each seat to be sure there are no nicks or cuts. Replace the seats if you feel any sense of scratchiness or roughness. Plastic seats are more prone to damage than brass seats, so if yours are plastic, check them carefully.
If the faucet contains a washerless cartridge, it will contain an O-ring instead of a flat seat washer. It also will have a filtering device in the body of the shank. Be sure to check the filter screen for debris before reassembling.
Faucet seats, washers, and O-rings are readily available at any hardware store. During reassembly, take extra care when threading the seats and the stem/bonnet assemblies into the body of the faucet. It’s quite easy to cross thread them, which could turn that 50-cent repair into a complete faucet replacement. After reassembly, turn the water pressure back on and check your work. Faucet repair is not as daunting as some might suspect.
{loadpositionEndBlurbHouseCalls}